Getting Started with Herman: Living Style Guides and Pattern Libraries

It all started with an innocent tweet:
https://twitter.com/mirisuzanne/status/948637526612324352
"Excited to announce our new open-source, Sass-driven pattern-library generator! Go design some systems!"
I follow Miriam on Twitter because I love everything she's ever done. At Redfin, we were huge fans of Susy, right up until she told us not to use it any more. And, like everyone else in the Drupal community and web developer community at large, we're hearing more and more about Atomic Design and the use of pattern libraries to build websites. We're encouraged to build and use canonical and living style guides. Many tools have come forward and, in the Drupal world, it looks like Pattern Lab has been a big winner.
At Redfin, we've tried a number of these tools, including Sam Richard's Style Prototyping approach, and attended trainings for Pattern Lab. We've also experimented with KSS for documenting Sass and generating a style guide.
Why Herman
What attracted me to Herman was the common predicament of the small-to-medium project and its budget's ability (or inability) to deliver on these prototypes. From the Herman announcement on Oddbird:
Creating the beautiful Salesforce Lightning Design System requires an ongoing full-time dedicated team. Those of us doing agency work don't often have that luxury, but our clients still need a system that will work for them.
So how can we make design systems part of an agile process – growing slowly along-side the application, the same way we write and maintain test-coverage as part of any project? How do we make documentation and design consistency the path of least resistance?
I'm a big believer in systems. That is, I'm a big believer in systems that work. If a human doesn't want to use a system because it's too much of a hurdle, the system has failed, not the human. So, the idea of "the path of least resistance" is appealing to me (or perhaps I'm just lazy but, nonetheless, systems should be built for the lazy).
So, Herman came along with all this promise and sparkle and I decided to give it a whirl. For starters, Herman is based largely in the foundations of SassDoc. SassDoc shares a similar purpose with KSS, though, having now played with it, I find its syntax just a bit easier to understand. Perhaps, since I've learned PHP Annotations for Drupal, the annotations in SassDoc feel natural.
Getting Started with SassDoc
To this end, Herman is actually just a "theme" for SassDoc. So, to get started, you are going to initialize a new SassDoc project. Like most of the front-end world today, new front-end projects are initialized using a tool like Yarn or NPM. At Redfin, we use Yarn, so we initialized our project using "yarn init" and answering the questions as appropriate.
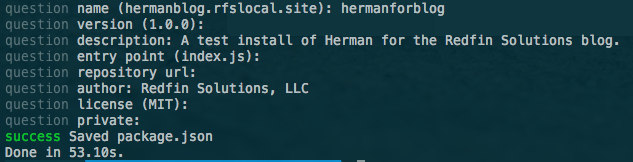
Once we were initialized, we added in our two dependencies - SassDoc and the Herman theme:
yarn add sassdoc sassdoc-theme-herman
Once that finishes, you have scaffolded out a Herman project… kind of. What you now need is all your Sass! Create a sass folder to get started and put a style.scss file in there. We'll start with something simple:
.button { border-radius: 5px; background-color: green; color: white; font-weight: bold; }
Here's our first simple component we'd like to document. Maybe, if you were lucky, you had SOME kind of note in there before, like // typical button styles or something.
SassDoc uses a "three-slash" syntax to pull comments in as documentation. So, let's enhance that a bit.
/// Components: small, re-useable components used on the site. /// @group components /// @name Button /// @group components /// @example html /// <a href="#" class="button">Click me</a> %button { border-radius: 5px; background-color: green; color: white; font-weight: bold; }
The first comment, which is offset by a newline from the rest, is called a "free-floating comment." It's just "out there," and not attached to anything. However, note that using the "group" annotation (@group components) I was able to assign it to belong to a group. Using other annotations, like name and example, I'm able to generate my style guide (at the end of the day, just a static site).
To generate, you need to be in the root of your project and run:
node_modules/sassdoc/bin/sassdoc sass --theme=herman
And this gives you the following static site (find it by visiting /sassdoc/index.html off your site's root):

Moving On
Let's get something different put together, a little more advanced. Let's throw in a mixin.
@mixin embed-container($width, $height) { $ratio: ($height / $width) * 100%; position: relative; padding-bottom: $ratio; height: 0; overflow: hidden; max-width: 100%; iframe, object, embed { position: absolute; top: 0; left: 0; width: 100%; height: 100%; } }
This mixin is inspired by Smashing Magazine's timeless article on the subject.
Now, let's annotate! Put this directly above your mixin.
/// Mixins: custom re-useable but configurable tools we use. /// @group Mixins /// Helper mixin to drop on the wrapper for an iframe /// that you would like to be responsive. /// /// @group Mixins /// @author Smashing Magazine /// /// @param {Length} $width - Element's width /// @param {Length} $height - Element's height /// @output CSS for the wrapper and the inner iframe that maintains the aspect /// ratio as it is resized. /// /// @example scss - /// .embed-container { /// @include embed-container(400px, 300px); /// }
The above documentation introduces us to the @parameter annotation, which allows us to document a parameter, its type, the name, a default value, and a description, using the syntax:
/// @param {type} $name [default value] - description
Also, note that we're not displaying markup here for our @example annotation; rather, we're using scss for the syntax to output. For mixins, this is incredibly helpful as it can show us what the compiled CSS is as a result of using this mixin! Let's go ahead and compile again (node_modules/sassdoc/bin/sassdoc sass --theme=herman).
UH-OH!
» [WARNING] Error compiling @example scss: no mixin named embed-container Backtrace: stdin:2 .embed-container { @include embed-container(400px, 300px); }
SIDE NOTE: In addition to being confused, I bet you're already tired of specifying --theme=herman on the command line every time, huh? Let's kill two birds with one stone.
Rather than specifying your Herman parameters every time on the command line, you can specify them in a JSON or YAML file. In that way, you then only specify -c /path/to/config every time. Of course, at this point, you're just robbing Peter to pay Paul. Switch one command line option out for another.
There's an even better option. Just name your config file .sassdocrc and put it in the root of your project and it will be automatically used. The entirety of that file (so far):
theme: herman
However, we haven't yet solved the problem of "no mixin named." See, the @example annotation from SassDoc doesn't natively support compiling Sass into its CSS counterpart. That's a gift from Herman. In order for Herman to compile the SCSS into CSS, though, each @example must be able to stand on its own, and this was the one area that really tripped me up. Thankfully, Miriam was there to help out.
To make this work, one option is to import the Sass file that we need in order for the example to stand on its own. Change your example to this:
/// @example scss - /// @import "style.scss" /// .embed-container { /// @include embed-container(400px, 300px); /// }
I'll save you some time before you run off ahead and compile--this still won't work. But, it's easy to fix. Go back to your .sassdocrc and specify a "herman" object with some configuration. (Full details on the herman object configuration.)
Make your .sassdocrc like this now:
theme: herman herman: sass: includepaths: - 'sass'
The includepaths directive is important so that Herman can resolve your import statements. Want to do one better? You can auto-import a path (or paths) using another declaration but, beware--nothing you auto-include should generate any actual Sass output or it will show up in EVERY example. This is best used for your utility files, like _extends.scss, _mixins.scss, etc. (Refer to our own Bundler Shell theme to see how we lay this out.) For example:
theme: herman herman: sass: includepaths: - 'sass' includes: - 'util/mixins'
If you auto-include your util/mixins (really ./sass/util/_mixins.scss) then you can make use of your mixins without needing to put the @import in every @example!
Another Side Note: README
If you are feeling harassed by "[WARNING] Description file not found: `./README.md` given." It's probably best to have a README.md for your project. This shows up as the text of the index.html page for the top-level of your SassDoc project. I just went ahead and created a simple one. This is a SassDoc configuration value, and if you'd rather create an introduction to your style guide that is separate from the main README for your project, you can set descriptionPath in your .sassdocrc file.
Level Up
This is all great but, we need to level up. What else does Herman offer?
No one can say it better than their own README:
In addition to the core SassDoc annotations, our @icons annotation allows you to display SVG icons from a given folder, and we extend the core @exampleannotation to display compiled Sass/Nunjucks output and render sample components. We also provide a @font annotation for displaying font-specimens, and @colors, @sizes, and @ratios annotations for displaying color-palettes, text and spacing sizes, and modular ratios."
Icons
This one is easy so we'll start here. Add a comment and use @icons \<path-to-icons-relative-to-project-root> and you're there! It auto-generates your icon previews with filenames, even optimizing them as it goes. (Bear in mind your SVG's should specify a viewBox or they will likely be very, very tiny in the preview.) It expects a folder with individual SVG files per icon.
Font Stack Previews
Things start to get a little trickier starting here. For the fonts, colors, ratios, and sizes annotations, you will need to generate some JSON that the front-end JavaScript/templates can use. There's a plugin called sass-json that is doing this for you--taking sass maps and writing them out to encoded JSON--but you need to export your data in order to do this. So, let's dissect the font annotation first.
/// @font key (styles, to, show)
In this case, the ‘key' is the variable name of the Sass map holding the information about your font style, and the (styles, to, show) are a list of font weights/styles that you would like to display, for example: (regular, bold, bold italic).
Note that, at least for Google Fonts, the numbers are a more consistent thing to use when outside of the normal keywords of bold and regular. I didn't have success with previews using things like "semibold" or "light." (This is because they only support valid CSS values for font-weight - though there's discussion around that: https://github.com/oddbird/sassdoc-theme-herman/issues/250 ).
Finally, the second line is indented, to show that it's still part of the @font annotation, and it consists of any markup needed for the font to render correctly (JavaScript tag, link tag, etc).
So, in real life, this looks like:
/// @font sans-stack (300, 300 italic, regular, 600) /// <link href="https://fonts.googleapis.com/css?family=Work+Sans:300,400,600" rel="stylesheet"> $sans-stack: ( 'name': 'Work Sans', 'source': 'https://fonts.google.com/specimen/Work+Sans', 'stack': ("Helvetica Neue", "Lucida Grande"), );
For a web font like this, we use the name (that is, the actual font name you would use if you were to display it in a font-family property), source (this renders as an external link when the preview displays), and stack (which are the fallbacks you've chosen when this font is not available).
Getting that to render, though...
This is all the annotation related to the font, specifically, but now we need to include this Sass map into the "herman" map more globally. There's a handy mixin that Herman provides, called "herman-add" which we can use to do that. After the map, I put:
@include herman-add(‘fonts', ‘sans-stack', $sans-stack);
In order to use this herman-add mixin, you will need to include Herman's utilities (where this mixin is defined), so at the top of my file I put:
@import "../node_modules/sassdoc-theme-herman/scss/utilities/_utilities.scss";
Finally, we need to do a final export of the Herman map into JSON. At the bottom of my Sass file, I put:
@include herman-export;
This ensures that the herman map is exported to JSON so the front-end can pick it up. The Herman team is currently working on improving this process but, for now, this is still a pretty clean way to handle it. If you get a little cuter than I did with your partials, you can have a Sass file that only outputs the herman map JSON so you don't need to pollute your regular CSS with it if you don't want to.
Keep this pattern in mind, because most of Herman's awesomeness depends on it. You'll see as we move on.
Colors
Now that we've established a pattern, we're keen to keep following it. For color palettes to be generated in your SassDoc static site, we'll follow a similar pattern. First, the annotation:
/// @group colors /// @colors demo-colors $demo-colors: ( 'alto': #d8d8d8, 'scorpion': #5b5b5b, 'tree-poppy': #f36c38, 'white': white, 'wild-sand': #f5f5f5, 'grey-light': #d5dbe4, ); @include herman-add('colors', 'demo-colors', $demo-colors);
First, I use the @group annotation to put this in the ‘colors' navigation over at the left. Then, the actual @colors annotation puts the map key you're going to use to add to the Herman map. We add those colors in a map, and then finally use herman-add to map $demo-colors into $herman. In this way, the herman-export we call at the very end will ALSO now include this color palette in the static site.
Sizes
For text sizes, a great preview can be generated to show you the various headings or sizes you want to use. Sense a pattern yet? Let's look:
/// All the sizes that we have. /// @group sizing /// @sizes font-sizes {text} $font-sizes: ( 'base': 16px, 'important': 1.8rem, 'largest': 3rem, ); @include herman-add('sizes', 'font-sizes', $font-sizes);
Ratios
Ratios behave nearly identically:
/// Ratios we are using. /// @group sizing /// @ratios my-ratios $my-ratios: ( 'line-height': 1.4, 'gutter': 0.5, ); @include herman-add('ratios', 'my-ratios', $my-ratios);
The only thing to know is that you can optionally display text sizes (or spacing sizes, or page sizes) as rulers, though the default is to display a text preview. To do this, add the optional "{rulers}" or "{rulers-large}" after the sizes annotation (rather than "{text}" - which is the default).
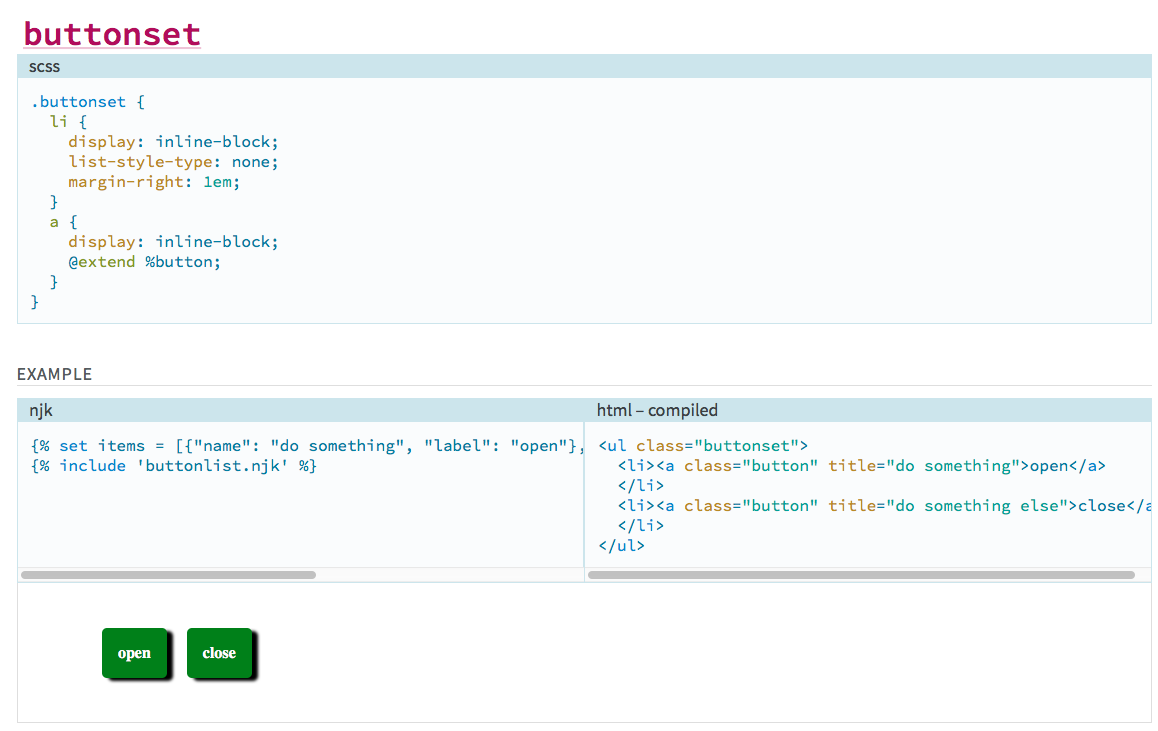
Nunjucks - Martial arts the templates up a notch
For markup that is more complicated than some simple HTML, you can write a Nunjucks template to generate output for a preview. Let's enhance our button example with a Nunjucks template.
/// @group components /// @name buttonset /// @example njk /// {% set items = [{"name": "do something", "label": "open"}, {"name": "do something else", "label": "close"}] %} /// {% include 'buttonlist.njk' %} /// .buttonset { li { display: inline-block; list-style-type: none; margin-right: 1em; } a { display: inline-block; @extend %button; } }
You'll notice I still put this in the components group but I've turned my regular button into a buttonset. You'll also notice immediately the @example annotation this time specifies the "njk" syntax, meaning "compile Nunjucks code." When using njk in an annotation, you are required to specify a templatepath in your config. (Alternatively, you can specify an entire Nunjucks environment, but to do that you must be using the Node API version, which I am not.) Add this to your .sassdocrc inside herman:
nunjucks: templatepath: './templates'
So, I created a "templates" folder off the root of my project and put a simple buttonset.njk file in it. (Dear Drupalists, don't be scared of Nunjucks--it's Django/Jinja-based templates for JavaScript, just the same way Twig is Django/Jinja-based templates for PHP!)
{% block content %} <ul class="buttonset"> {% for item in items %} <li><a class="button" title="{{ item.name }}">{{ item.label }}</a></li> {% endfor %}` </ul> {% endblock %}
Now that I've configured a templates directory, and my syntax for using the templates is all set up, I get a fully rendered example. It includes (a) the Nunjucks language used to generate it, (b) the fully compiled HTML markup, and (c) a fully rendered example with all of my styles!
For bonus points, check out Nunjucks macros, which should help you further componentize your markup into easily-reproduced snippets. If we do it this way, we can sort of reverse the order. First, we import our njk file which defines our macro:
/// @name buttonset /// @example njk /// {% import 'buttonset.macro.njk' as mymacro %} /// {{ mymacro.buttonset([{"name": "do something", "label": "open"}, {"name": "do something else", "label": "close"}]) }}
...and our Nunjucks template is slightly different, wrapping the block with a macro call. A macro is similar to a "function."
{% macro buttonset(items) %} <ul class="buttonset"> {% for item in items %} <li><a class="button" title="{{ item.name }}">{{ item.label }}</a></li> {% endfor %} </ul> {% endmacro %}
The Power
So, by combining all of these elements directly into the Sass you're writing for your agile site, you can document on the fly and have an easy way to:
- Reference and document your mixins
- Display typography stacks and document when you should use each
- Show heading sizes and spacing ratios for vertical rhythm
- Discuss branding color palettes and describe how each should be used
- Demonstrate the icon set available to the application quickly
- ...and so much more!
The Review
So what do I like and dislike about this? What did I learn?
For someone like me, a lot of this was actually quite new coming in. Not just the fundamental concepts that Herman brought, but all of it. I had never used SassDoc before, though I'd played briefly with KSS. I'd never even heard of Nunjucks before, though I had used Twig. But also, the concepts that give Herman its power also add complexity to an already complex stack. You need to remember that, in a sense, everything is compiling twice. Once, it's compiling your Sass to be output (and then you're bringing that output into the static site via custom CSS), but it's also compiling all the SassDoc comments into a static site as well. These two different steps are nonetheless sourced largely from the same files, so all the pieces of the puzzle feel like they need to fit together just right for everything to work in harmony. Once that was fundamentally understood, the idea of the JSON encoding actually made total sense, and was OK to understand.
I also spent a lot of time getting bit by the Ruby bug. At Redfin, we sort of skipped over the whole Gulp / Node API thing. We used a lot of Ruby Sass and Compass and Bundler, until we recently switched to a stack based on Dart-Sass. While trying to learn, I tried to strip everything down to its fundamental elements, and that actually got me a few times. I should've started with a modern stack and used the node-sass implementation that I installed with my yarn install, and I wouldn't have had such issues. (With that said, we never would've improved Herman to support Ruby Sass!)
Overall, I believe that this is definitely good enough to go into our next project. Beyond that, I am confident in the Herman team that if I find any bugs as we use it, they will be responded to swiftly, which is hugely important for adoption of something kind of new like this.
UPDATE 04-09-2018: Added additional clarifications from Miriam.
Controlling Facebook Preview Images with the Metatag Module

Have you ever posted a link to facebook and wondered where the image comes from in the post preview? Ever wondered if this image is even correct or relevant to what you are posting?
Recently, a client of ours pointed out that when users post links to Facebook in order to share upcoming live shows, the set of rendered images in the post previews were displaying unrelated content. Specifically, images from the site header (like the site logo) were being defaulted to in the post preview much to the client’s chagrin. Her preference was to have an accurate picture of the artist displayed in the Facebook post instead of a set of unrelated images parsed from other sections of the site.
This is where the Metatag module in Drupal contrib can give you better control over what images get displayed in social media posts. It works by adding meta tags to the page like <meta property="‘og:image’" content="//mydomain/path/to/desired_image.png’"/> for example. To get started, first install the Metatag module and enable the base module. Then, head over to Admin->Config->Search and metadata->Metatag and you will see a set of global properties to change. Alternatively, by clicking the “Add default meta tags” button you can restrict the placement of these tags to the content types of your choice instead of placing tags on all content types globally. Next click “Override” (or edit) off to the right and expand the “Open Graph” section at the bottom of this page. In the “Image” input box you can enter a token to an image field of your choice from your content type and the Metatag module will output a tag on content pages with the image url as seen above. Facebook will scrape this and render the correct image.
Panels and the Metatag: Panels Sub-module This can also be done if you have panel pages on your site but you have to enable the Metatag:Panels sub-module first. Instead of going to configuration to add the image field token as described above I found that by going into Admin->Structure->Panels and editing the panel page from there was the preferred approach. With the sub-module enabled a “Meta tags” menu item became exposed in the vertical tabs. When clicked it brings you to an identical set of input fields ready to accept site tokens. Make sure your token browser is enabled to search available tokens, and once a token is saved you should inspect your page from the browser to ensure that the new meta tag is being output to the head section. With the newly generated image meta tags on your site anyone posting links to your site will be sharing relevant images that you've designated for the world to see and that's pretty cool.
There is also a Metatag:Facebook sub-module which can be leveraged to do similar tasks but because our pages were panel pages we just needed the panel sub-module enabled.
If your metatag is being generated but facebook isn’t picking it up try the dev tools link below: https://developers.facebook.com/tools/debug
This is a great tool that can tell you the last time the link was scraped among other things. This will help determine if Facebook has cached the link instead of rendering a new post with the newly created open graph image metatag. There are a lot of Metatag sub-modules that come with the main module which can be a bit daunting, but once you find the right one and the right token you can do a lot to better control the use of metatags being generated on your site.
Understanding Drupal 8's Migrate API

This past weekend, I was honored to be able to present a session at 2017's New England Drupal Camp (NEDCamp) about Drupal 8's Migrate API. Redfin has implemented many Drupal 8 migrations to date both from CSV data sources and legacy Drupal sites (Drupal 6 and 7). As a result, we want to share with you what we've learned in hopes of saving you the time often spent in the trials and errors of data migration.
My Master's degree is in Technology Education, so I understand that people learn things differently. Some people are auditory or visual learners while others like to read. To that end, I wanted to summarize our session here. If you are an audio or visual learner, please check out these resources:
- Watch the YouTube recording of the presentation (thanks, Kevin Thull!)
- See the slides if you want to skip ahead or follow along
- While you're at it, check out the other great presentations from NEDCamp!
Otherwise, let's peek at the concepts...
The overall process is:
- Scaffold out a module (.info.yml file). You can use Drupal Console for this.
- Write YAML files to define your migrations.
- Set up any global configuration if needed (your legacy database connection credentials in settings.php, a folder for your CSV files, etc).
- Extend/alter/write any custom plugins or code to support those migrations.
While you can use the Drupal Migrate UI to do this, I recommend building your Drupal 8 site the way you want (maybe taking advantage of newer paradigms like paragraphs, for example), and then worry about your migrations. There are four main modules that come in to play when not using the UI. Two are in core--migrate, and migrate_drupal. "migrate" lets you get anything into Drupal 8, while "migrate_drupal" extends and supports that to enhance your experience when migrating IN from a Drupal 6 or 7 (or 8!) site.
Two modules in the contrib space help you above and beyond what is provided in core. Migrate Tools provides Drush command integration for managing your migrations, while Migrate Plus provides loads of enhancements for migrating your data (additional plugins, etc). It's important to make sure you're using the right version of the module for your version of Drupal, by the way--but that's easy since you're using Composer, right?
Write Some Migrations
You will need to drop a migration YAML file in your module's /migrations folder. Generally, the yaml file is named after the id you specify for your migration plugin. As a full example, see core's d7_node.yml migration.
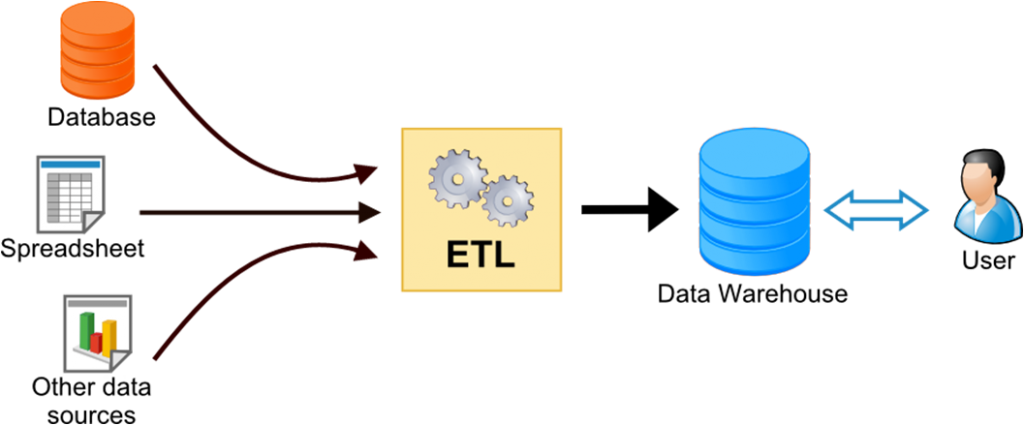
The Migrate API follows a traditional software design pattern called Extract, Transform, Load. To avoid some confusion with the concept of "Load" (in this case meaning loading data INTO your Drupal database), there's some different terminology used in Migrate:
- Extract == Source
- Transform == Process
- Load == Destination
One thing that Migrate Plus provides is the concept of a "Migration Group." This allows multiple migrations to share some configuration across all of them. For example, if all migrations are coming from the same MySQL database (say, a Drupal 6 database), then that shared configuration can go into the migration group configuration once rather than into each individual migration.
There's some global configuration that goes into each individual migration, for example its "id" key (the unique ID of this migration), and its "label" (friendly name in the UI / Drush).
One thing you can specify also are "dependencies" - for example to a module. You can also enforce "migration_dependencies," which means that before THIS migration is run, THAT one needs to run. This is a great way to ensure references (like entity references, or taxonomy terms) are migrated into the site before anything that uses them.
Each migration then should specify three unique sections--source, process, and destination (sound familiar?).
Source
The source section specifies which plugin to use. These plugins are usually found in the module involved. For example, if you want to migrate data in from Drupal 7 nodes, take a look in core/modules/node/src/Plugin/migrate/source for the implementation / plugin id to use. Often, though, you'll actually find yourself writing a new Class in your own module which extends this one.
Each different source plugin might have some additional configuration that goes along with it. For example, with "plugin: d7_node" you might also specify "node_type: page" to migrate in only basic pages from your Drupal 7 site. You might also specify "key" here to say which database key from the $databases array in settings to use (if that wasn't specified globally in your migration group!).
The purpose of all source plugins is to provide a Row object (core/modules/migrate/src/Row.php) that is uniform and can be consumed by the next part of the process.
If you do write your own migration plugin, two methods I find myself frequently overriding are query() (so I can add conditions to the typical source query, for example - like only grabbing the last year's worth of blog posts), and prepareRow(). The method prepareRow() is your hook-like opportunity to manipulate the Row object that's about to be transformed and loaded into the database. You can add additionally-queried information, or translate certain values into others, or anything you need in prepareRow(). The only thing to beware of is every Row becomes a destination entity, so if you're doing something like joining on taxonomy terms, you're better to do that in prepareRow and add a new property to it with setSourceProperty() rather than, say, LEFT JOINing it on in the query.
Destination (yes, I skipped Process)
The destination plugins work largely the same way. You simply specify what entity (usually) you're migrating into. For example, you might have destination: 'entity:node' and any additional configuration related to that destination. One example for entity:node is to add default_bundle: pagehere so that you don't need to set bundle: 'page' in your process section (which we're about to get to). Similarly, if migrating files, you can specify source_base_path: 'https://example.org' to automatically download images from that path when importing!
Like source plugins, destination plugins have additional configuration here that is tied to the plugin.
There are so many things that are entities in Drupal 8, the possibilities are vast here - you can migrate nodes, users, comments, files, sure. But you can also migrate configuration, form display, entity view modules, anything in contrib, or your own legacy code! Migrate Plus also provides a "Table" destination so you can migrate directly into MySQL tables inside of Drupal (note that this is generally not best practice if you're migrating into entities--you're better off using the entity:whatever plugin so you take full advantage of the entity API).
Process
This is where all the real magic happens, in my opinion. To keep this blog post short (is it too late for that?), I won't go too deep into all the process plugins available, but I will talk about a few special cases and then encourage you to check out the documentation for yourself.
The "get" plugin is the most basic of all. It simply means "take the value off the Row object for property x, and map it to value y." In your real migration's yml file it would look like destVal: sourceVal - which simply means "take what's in $row->sourceVal and put it in the destination's "destVal" property.
The "migration_lookup" plugin goes one simple step further than get and translates the incoming ID to the new ID value on the new site. For example, if you have a migration that migrates person nodes and the nid was 65 for John Smith on the Drupal 6 site, but is 907 on the new Drupal 8 site, a reference to that person (say on the "authors" field of your "Research" content type) would also need to be translated. This plugin transforms the incoming 65 to the correct 907 by referencing a migration that has already been run (remember the migration_dependencies key?).
Multiple plugins can even be chained together to form a "pipeline" of transformations that can happen in order. For example, if your old database only had usernames as "Chris Wells" and "Patrick Corbett," but you wanted to make usernames, you could run that through the machine_name plugin to change it to "chris_wells" instead. But, what if there was already a "chris_wells" user? Well, you can then run the new value through dedupe_entity to append an "1" or "2" etc until it's unique. You can create fairly complex pipelines here in the yml file without having to touch any PHP code.
Sometimes a field in Drupal has a "nested value," like the body or link fields. The body field has a "value" and a "format" on it. To map these, you use a slash (/) to separate the field and the sub-field, like 'body/value': description and 'body/format': format -- just be sure and use those "ticks" (apostrophes, single-quotes, whatever you call them) around these types of keys.
Feel free to check out all the core process plugins, and even ones provided by contrib, like: get, migration_lookup, machine_name, dedupe_entity, default_value, concat, explode, flatten, static_map, substr, skip_on_empty, skip_row_if_not_set, menu_link_parent, callback, entity_generate, and entity_lookup!
There's one more special one, formerly known as "iterator" and now called "sub_process." This lets you create multi-step a pipeline against an array of structured data arrays. Make sure to pay some special attention to that one.
Put it all together
So by now you've created your shiny new Drupal 8 site just how you want and you've written a module (.info.yml file, really). You've placed all these migrations in it. You can place them in config/install and they will be read in as configuration. You can then edit them as needed using drush config-edit or similar in Drupal Console. You could also uninstall and reinstall your module each time you alter the yml files.
Alternatively, you can also place them in /migrations (off your module root) and instead they will be loaded as plugins instead of configuration. This way is likely preferred since you can just flush the plugin cache when you make changes to the YML file.
Once you also have your source set up (database, CSV files, XML, whatever), you can start to run your migrations with Drush!
The most commonly-used Drush commands for migrating (in my world) are:
- migrate-status - where are things at?
- migrate-import - run a migration (single or whole group)
- migrate-rollback - "un-run" a migration
- migrate-reset-status - used to reset a migration to "Idle" state if the PHP code you're writing bombs out or you press Ctrl-C in frustration.
Others I don't use as frequently are:
- migrate-stop - stops a running migration and resets it to idle (I usually press Ctrl-C and then do a
drush mrs(migrate-reset-status)) - migrate-fields-source - list all the available properties on Row to import (I usually just inspect this in the debugger in prepareRow())
- migrate-messages - display messages captured during migration (PHP warnings, etc) (I usually just look at the database table where these are stored instead of printing them in terminal)
WHOA.
So there you have it. Migration in a nutshell! Please do feel free to leave comments and questions below or reach out to us at Redfin if you need help migrating data into your shiny new Drupal 8 site.
Adding tabindex and jQuery keypress to make anchor-less links more accessible

Anchor tags are regularly used to handle page click events and are accessible by default. Visitors unable to use a mouse, for example, can press the tab key on the keyboard to navigate individual links on a page and can typically press the return/enter key to perform a ‘click’ on a selected anchor link. On some of our sites, however, we show/hide text in response to a mouse click on an accordion div element and not anchor tags which leaves visitors without tab and return/enter key functionality.
This issue was addressed by first copying and renaming a classy field twig template down from core into the custom theme and adding a tabindex=‘0’ attribute to each accordion div item. This sweet attribute and value pair sets the element’s position in the tab order of the page relative to the elements around it. This means that as a user tabs down through the page content the divs get focus in a logical sequence. A simple cache flush and voila! Tabbing functionality complete!
With tabbing in place, the return/enter key ‘click’ functionality was coded in next. To achieve this a jQuery keypress event listener was added to the same div items in the site’s javascript file. The handler function first checks for a keycode equal to 13 off the div’s event object, and if true will broadcast a click event from the div element to mimic a mouse click. With just a few lines of code the return/enter key can now ‘click’ more than just anchor tags, and invoke any click event listeners written to respond to true mouse clicks.
In summary, a twig template modification added tabbing capability to the accordion and with just a few lines of javascript we invoked a click event listener on a return/enter keypress event to show/hide accordion content. Now accordions are accessible to everyone and that’s pretty great.
Pulling Salesforce Data in as Taxonomy Terms in D7
Salesforce Suite is a group of modules for Drupal that allows for pulling data from Salesforce into Drupal, as well as pushing data from Drupal to Salesforce. The module api provides some very useful hooks, including the _salesforce_pull_entity_presave hook implemented by the Salesforce Pull module. In this blog post, we’ll look at using that hook to pull three Salesforce custom fields (select lists) into Drupal as taxonomy terms in three vocabularies.
Create a custom module to house the hook called <sitename>_salesforce and create a <sitename>_salesforce.module file. In that file, drop in the presave function, as copied from salesforce.api.php in the Salesforce Suite module:
/**

 * Act on an entity just before it is saved by a salesforce pull operation.

 * Implementations should throw a SalesforcePullException to prevent the pull.

 *

 * @param $entity

 *   The Drupal entity object.

 * @param array $sf_object

 *   The Salesforce query result array.

 * @param SalesforceMapping $sf_mapping

 *   The Salesforce Mapping being used to pull this record

 *

 * @throws SalesforcePullException

 */

function hook_salesforce_pull_entity_presave($entity, $sf_object, $sf_mapping) {

  if (!some_entity_validation_mechanism($entity)) {

    throw new SalesforcePullException('Refused to pull invalid entity.');

  }

  // Set a fictional property using a fictional Salesforce result object.

  $entity->example_property = $sf_object['Lookup__r']['Data__c'];

}
Take a look at the example code in the function body but remove it.
The hook gets called during the salesforce_pull_process_records function with this line:
// Allow modules to react just prior to entity save.

module_invoke_all('salesforce_pull_entity_presave', $wrapper->value(), $sf_object, $sf_mapping);
So, that’s where we will intervene with our custom code. With this hook, we have access to the data queried from Salesforce, and the entity that is about to be saved into Drupal, so it's a perfect time to do any translations between the two data sets.
The first problem we have to address is that, by default, the Salesforce Pull module will create a new node as it processes each Salesforce record instead of modifying the existing nodes on your Drupal site. If you don’t want this behavior, add this code:
// first of all, don't create new nodes

if (isset($entity->is_new) && $entity->is_new == TRUE) {

  throw new SalesforcePullException('Tried to create a new node.');

}
You may also want to look at the _salesforce_pull_mapping_object_alter hook to aid in prematching nodes.
Then, we need to define our taxonomy vocabularies:
// lookup table

$names_vids = array(

  'exampleVocabularyA' => array('vid' => 1, 'field' => 'field_example_vocabulary_a'),

  'exampleVocabularyB' => array('vid' => 2, 'field' => 'field_example_vocabulary_b'),

  'exampleVocabularyC' => array('vid' => 3, 'field' => 'field_example_vocabulary_c'),

);
Gather the terms from $sf_object like this:
// gather terms

$incoming = array(

  'exampleVocabularyA' => explode(';', $sf_object['Terms_A__c'] ? $sf_object['Terms_A__c'] : ''),

  'exampleVocabularyB' => explode(';', $sf_object['Terms_B__c'] ? $sf_object['Terms_B__c'] : ''),

  'exampleVocabularyC' => explode(';', $sf_object['Terms_C__c'] ? $sf_object['Terms_C__c'] : ''),

 );
You’ll want to clean up the incoming data:
array_walk_recursive($incoming, 'trim');

$incoming = array_map('array_filter', $incoming);
Then, we need to iterate over the incoming terms and create a new term if it doesn’t already exist in Drupal. Finally, we set the tids on the desired nodes:
foreach($incoming as $vname => $term_names) {

  $tids = array();

  foreach($term_names as $term_name) {

    $tid = taxonomy_get_term_by_name($term_name, $vname);

    if (empty($tid)) {

      // add the term if we don't already have it

      $newterm = new stdClass();

      $newterm->name = $term_name;

      $newterm->vid = $names_vids[$vname]['vid'];

      taxonomy_term_save($newterm);

      $tid = $newterm->tid;

    }

    array_push($tids, $tid);

  }

  // set tids on target nodes

  // first unset all existing tids

  $entity->{$names_vids[$vname]['field']} = array();

  // using $length here because we modify $tids in loop

  $length = count($tids);

  for ($i = 0; $i < $length; $i++) {

    $tid = array_shift($tids);

    $tid = array_keys($tid)[0];

    $entity->{$names_vids[$vname]['field']}[LANGUAGE_NONE][$i]['tid'] = $tid;

  }

}
This will keep your Drupal nodes in sync (on each cron run) with any terms added or deleted on the Salesforce objects.
(If you are having trouble getting Salesforce to complete its whole queue on a single cron run, I recommend this blog post for troubleshooting tips: Drupal Salesforce Not Updating Records. In particular, we recommend the Queue UI module.)
Add to Dashboard Report Button Removed from Google Analytics

Google seems to be slowly favoring their newer, more fully-featured, Data Studio over existing Analytics dashboard and reports. Recently, the "Add to Dashboard" functionality was removed.
According to Google's dashboard documentation, adding a report to a dashboard is being deprecated in favor of a "new Analytics interface." Perhaps the new interface will be a direct tie-in to their Data Studio vs. another, separate option to create dashboards, which has been somewhat confusing for our clients.
Installing D8 Contrib Modules
In Drupal 8 there are a handful of ways you can install contrib modules to your project and here we’ll discuss some of the pros and cons of each.
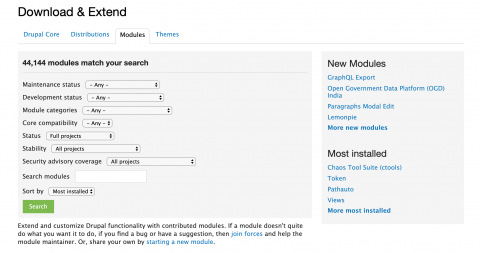
When installing a D8 contrib module “manually” you have to navigate to a site that hosts the module’s compressed tar.gz or zip file like at drupal.org/project/project_module or github and download the file of your choice. Next, the module has to be extracted, usually by double clicking the compressed icon, and then the new, uncompressed module folder that now appears may need to be renamed to just its machine name (for example from paragraphs-8.x-1.1 to just "paragraphs"). This module folder must then be moved into the site’s /modules directory and enabled using either Drush, Drupal Console, or the Drupal admin UI. This manual approach isn’t completely terrible because it does work and you have control over each step, but it isn’t the recommended strategy mainly because the entire module codebase has to be committed into version control which isn’t ideal. More on this in a bit.
By utilizing the extend tab in the admin UI to install a D8 contrib module, you can automate some of the steps encountered within the manual strategy but the same major problem exists - the entire codebase has to be checked into version control. It’s worth noting that this functionality allows you to point to an already downloaded tar.gz/zip file or provide a link to one hosted remotely. When the file is then uploaded, Drupal will extract the module for you and will place it into the correct directory as well. For this to work, though, you need to make sure your web user can write to the modules folder, which is generally frowned upon from a security perspective.
The previous methods definitely work and any developer should be aware of them but with D8 came the ability to use Composer to manage Drupal modules. It’s technically a dependency manager that works in much the same way as Node.JS’s "npm" and Ruby’s "Bundler."
Once installed from getcomposer.org you can find, install, update, and remove modules from the command line among other things which is a big win especially when many dependencies need updating. Also, instead of having to commit the entire codebase of the module(s) into version control, you only have to commit the manifest files (composer.json and composer.lock). The .json file lists out what dependencies the project needs and the acceptable version ranges of each while the .lock file records what versions actually got installed. It's very bad practice to commit dependencies that aren't yours into your repository and also because it increases the size of the repository significantly. To include a new dependency simply execute ‘composer require drupal/module_name’ and composer will add the module to the .json file. Then execute ‘composer install’ to get the module codebase from the Drupal packages API (NOTE: not "Packagist," which is the default Composer package respository) and to update the .lock file. Running ‘composer update’ is great because it will update all the modules to their latest versions allowed by the .json file, install them, and update the .lock file. Composer however will not enable the modules for you in Drupal, so that is where Drush can come to the rescue. Lastly, you can still use Drush or Drupal Console in D8 to install modules but composer is definitely the preferred tool because of these added benefits.
Further Reading
Handling High Unicode Character Sets in Web Fonts

When odd characters are displayed instead of the intended text, it’s often due to the font not supporting “high unicode” characters like the marcon character over the letter “a”: ā. Checking the google font @import url in a SASS file showed that the latin extended character set was not included. To do this:
- Find your font at google fonts using the search bar in the upper right and click the font name
- Click the “SELECT THIS FONT” link in the upper right
- Click the “Family Selected” black bar that appears at the bottom right of the page to expand the url builder window
- Click customize
- Scroll to the bottom and select “Latin Extended”
- Go back to the “Embed” tab and you will see that the urls in the STANDARD and @IMPORT tabs have been updated with “subset=latin-ext”
- Paste the embed code of your choice into your style sheets or sass files and voila! Your special characters should render.
In a recent case they did not render because the google font being used, “Lato,” was actually out of date despite there being a latin extended option (your font will not render if the font author has not created a glyph for that character). The updated Lato font files were on the font author’s website and downloaded to a font folder within the Drupal theme.
The author had conveniently included a CSS file with an @font-face block linking to each typeface file in the download. Enter the below link in your browser to see the data returned:
https://fonts.googleapis.com/css?family=Lato:300,300i,400,400i&subset=latin-ext
Each @font-face block can contain a number of attributes such as font-weight, font-style, font-family, and src. The author had chosen to name each typeface differently and set font-weight to normal for each despite having light, normal, and bold etc. character sets in the download.
The Google font API implements a different approach, however. In the above example all @font-face blocks return with a font-family identifier of “Lato” as opposed to a unique identifier per block like “Lato-Light” or “LatoRegular” as the font author had done. Google also explicitly sets a numerical value in the font-weight attribute as opposed to a consistent font-weight value of “normal” for all.
You can use either approach, but if you set up your @font-face rules like Google does with consistent font-family names and numerical font-weights just make sure you specify the font-weight declaration in addition to the font-family name when building the declarations that apply to your markup so that the correct set of glyphs can be found and applied.
Installing (FREE) Let's Encrypt SSL Certificates on Acquia

Recently, one of our Enterprise clients asked for some help installing SSL certificates on their Acquia-hosted Stage and Development environments. This is not something that Acquia seems to provide (they do provide basic SSL on dev/stage environments, but not with hostname matching), so we set out to get them set up. They use their dev and staging environments to demonstrate new content and features to stakeholders, and some were getting scared off by the SSL certificate warnings.
Rather than pay, we decided to try it out with Let's Encrypt, which if you haven't heard, is the amazing and relatively-new Certificate Authority that provides FREE CERTIFICATES, and has a mission of enabling SSL everywhere.
 Get Certbot
The first thing you need to do is download certbot. Certbot is a command line tool from the EFF for managing SSL certificates with Let's Encrypt. At Redfin, we use Macs with Homebrew, so the easiest way to get the tool was to enter `brew install certbot` into a terminal. Now, there's a "certbot" global executable to use.
If you follow the "download certbot" link above, and for example enter "Apache" and "Ubuntu 14.04," you'll get instructions for how to install certbot on other platforms.
Once you have certbot downloaded, you need to run the "manual" method of validation. This feels like the old familiar way of verifying site ownership--adding some files to a particular directory. Let's Encrypt then calls out to that URL, and if it finds you put the right thing there, then it assumes you have control of that website, and provides you with the certificate.
On your local machine, run the certbot command that does manual verification: `sudo certbot certonly --manual -d SITEstg.prod.acquia-sites.com -d SITEdev.prod.acquia-sites.com` (where SITE is dependent on your specific Acquia setup). You'll keep this command running as you perform the next steps.
The "certonly" and the "--manual" are the main influencers here. Note that you can add as many -d's and domains as you need. If you have more dev environments than the standard stage/dev in Acquia (my client did), you can just keep adding the -d's. Note that also on my Mac I had to run this with 'sudo' in front of it, because it writes to /etc. You can also specify some additional parameters on the command to put these files in a separate location if you need.
Allow in .htaccess
This starts the process of verifying your sites. As you step through, it will give you some long, hash-y looking text strings that need to be available at a particular URL. According to the spec, this is at a .well-known/ folder off your site root. In order to allow Drupal to see this, you may need some changes to your .htaccess file.
If you're using a Drupal 8.3.x site (newer than Feb 9 2017), the issue has already been fixed. See https://www.drupal.org/node/2408321 for more information.
If you're using Drupal 7, then as of this writing it has not been fixed in core. See https://www.drupal.org/node/2847325 for more information. Essentially you need to allow .well-known in the FilesMatch directive at the top of .htaccess, and then exclude it from the main RewriteRule later down in the file.
Make verification "file" visible
The next thought you might have is, "OK, now I need to put all the files that need to be visible in that .well-known/acme-challenges/ry784yfy7...fdhj directory." Except, you don't really. (Pro tip: you do not need to enable live development mode on 4 environments at once and crash the server.)
The reason why not? The fabulous Let's Encrypt Challenge module. This lets you use the Drupal UI to enter your challenge information, or upload files to sites/default/files to answer the challenges. Download that module and push it to a branch, and set all of the Acquia environments your enabling Let's Encrypt SSL for, to use that branch. Enable the module on each dev/stage site, and as you walk through the certbot command (it gives you a challenge for each domain), log in to the site, enter the challenge, and hit save. You can then pull up the URL that certbot gives you, in order to verify that the module is doing what it promises. (Important note here, if you accidentally pull up the URL before you've changed .htaccess or enabled it, Acquia's Varnish is going to cache the bogus response and validation won't work. If you accidentally do this, be sure and flush the Varnish caches at Acquia for the environment where you got an itchy trigger finger.)
When the certbot process completes, it will tell you where you can find the certificate files needed. These are stored locally on the machine where you run certbot, in the case of a Mac with certbot installed with Homebrew, in /etc/letsencrypt/live/FIRSTDOMAIN (where FIRSTDOMAIN is the first domain you passed into your certbot command, above).
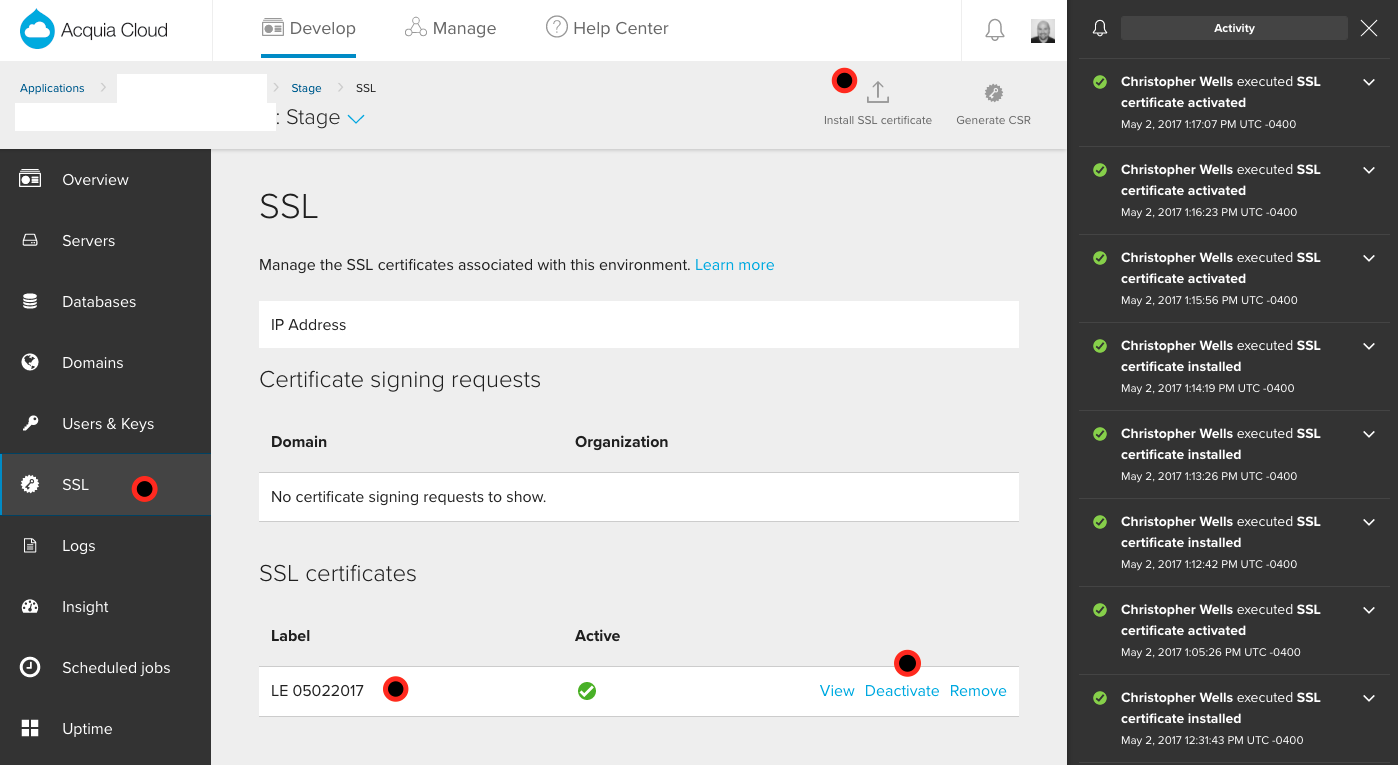
Tell Acquia You Got the Goods
This is a two-part process. By logging into your Acquia console, you must go to each individual environment and go to the SSL section, in the nav at the left hand side. From there, you can click "Install SSL Certificate" at the top. You will be prompted to enter four pieces of information: (1) a name for your certificate (ex.g. "LE 05022017" because it's Let's Encrypt and the day it was created), (2) the private key for the certificate (use privkey.pem from the folder above, where certbot put all this info), (3) the certificate itself (use cert.pem), and (4) the "chain" certificate (often called "intermediate" certificate), which establishes security from your certificate all the way to a Root Certification Authority (use chain.pem). NOTE: with Acquia, you will not use fullchain.pem. This is simply a file that concatenates all the information together into a single certificate file.
The second part of this process is to click "Activate" next to the certificate once the "installing" activity is completed.
Again, this needs to be repeated for each environment, but with the same certificate information.
In the below screenshot I've tried to call attention to some relevant parts of the SSL screen in the Acquia console:
We hope this proves helpful in getting some basic SSL certificates installed in your own Acquia environments!
Auto Hiding Scrollbars for IE10, IE11, & Edge

Recently, we had some pesky scrollbars hanging around in IE11 and Edge that were showing up unnecessarily. To hide them when the user isn't interacting with them, here's what you can do.
For Windows 8 and later, you can use this property:
You can slap this in your code base and the scrollbars should show/hide upon interaction instead of showing by default:
html {

-ms-overflow-style: -ms-autohiding-scrollbar;

}