What to Expect During the Redfin Solutions Discovery Process

Our team is ecstatic to be working with you on your next big web development project! Whether you’re seasoned to development agency collaborations or it’s your first time, we’re here to make sure the process is as smooth as possible. In this blog post, we’ll explore essential steps of our discovery process to learn more about your website visions and goals, and the paths we’ll take to bring them to fruition.
The Discovery Process: Part I
The beginning phase of the Redfin Solutions discovery process is mostly a documentative phase. On the Redfin team, you’ll meet with a project manager, UX designer, and lead developer (although sometimes, one person could be two of those titles). Any stakeholders on your side should be assembled in advance, as they will be recurring key figures in the discovery process and future status updates as the project progresses.
-
Identifying Goals
We want to know what your goals are, and ultimately what solutions you are trying to reach. What are your distinct goals for both the business and the site itself?
-
Identifying User Groups
We’ll want to gather target demographic information to identify the different types of people that will be using the site. As an oversimplified example, a university’s website would have user groups of “parents” and “students.” User groups you’re aiming to attract on your site will be identified during this phase, as well as any sub-groups, such as “prospective students” and “enrolled students.”
-
Conduct User Interviews
What better way to learn about a site’s true functionality than to ask those who use the site themselves? In this phase, we talk to real people who currently use the site, or those who would potentially use it in the future. We’d highly recommend talking to between five and seven individuals per user group to gain a proper feel of how each person uses or intends to use the site, how the site benefits them, and other relevant topics.
-
Create Personas
A persona is a fictional user that emulates the idea of an actual person who may be using the site. Personas help us comprehend the behaviors and challenges of actual users in any user group. This step is especially helpful in helping us understand what prompts a person to visit the site, what specifically they will be looking for on the site, and how their user group affects their interaction with the site.
-
Generate User Stories
User stories are written descriptions of site features by members of various user groups. During this phase, we typically use this format:
as a [user group], I want to [action] so that [benefit/value].
For example, “as a prospective student, I want to see pictures of dorm rooms, so I am not anxious about what life will be like”
The Discovery Process: Part II
Now that we’ve done some research intake, it’s time to get a bit more creative. We now have a better idea of what we want to see on the site, and can begin creating visual plans of how we’ll reach our finished product.
In Phase II, it’s important to reference the information that we’ve garnered in Phase I as the most helpful tools to start thinking about design aspects. For instance, personas become less important in this section, but will resurface when revisiting something that we know may impact certain users of the site.
-
Sitemap
We’ll need to lay out where all site pages will be organized, which is where a sitemap comes in handy. The team will determine the information architecture of the site, which will ultimately make it easier for a user to find pages they need. This may be done physically or virtually by our designer via a card sorting practice. Our team often uses Whimsical to create the sitemap to share with you and review collaboratively.
-
Design Strategy
Design will have a significant impact on how a user interacts with the site. Our team will present solutions for making site content easily navigable, with users able to quickly find the exact information that they need. Have a bunch of content that needs to be said, but is lengthy and too dense for a reader to skim quickly? We’ll propose ideas that will break up this content into organized components, streamlining the viewer’s focus to where it needs to be.
-
Wireframes
A wireframe is a visual tool that outlines a webpage’s interface. This sounds similar to a sitemap, but the difference lies in the design aspect. A wireframe is intended to the visual framework of a site, while a sitemap relates to the content of the pages themselves. A wireframe consists of boxes and filler text, known as Lorem ipsum, to provide a rough layout of where components and content will be placed. Depending on the complexity of the project, we’ll use Freehand or Figma. Here, user stories from Phase I are used to bring all generated ideas into fruition.
-
Additions
There may be some as-needed steps, depending on any more additional work you’d like to have done. This can include user testing, industry standards research, and competitive analysis, among other steps. These steps may be more involved in the design strategy, which will be segued into in the latter half of the Part II discovery process.
Wrapping Up
Hopefully, this gives a general idea of what to expect when you start a new project or upgrade with the Redfin team. Our experts are ready to guide you through this process to bring your website ideas into a reality! Thank you for partnering with Redfin Solutions, and we’re thrilled to start working with you.
How to Build Custom CKEditor5 Plugins for Drupal

Would a Text Filter Work Instead?
Before jumping headfirst into CKEditor, consider the outcome you're hoping to achieve and whether it needs to be in the text editor, or if it could be applied when rendering the text. For the latter, an easier solution may be a text filter. Text filters don't affect the editor preview, but if the logic is consistent, it can automate lots of adjustments such as:
- setting a special attribute on external links
- attaching a JS library if an image is present
- appending a trademark symbol to specific phrases
For more help on creating a custom text filter, see the how-to from Lullabot and Drupal's Filter API.
However, if you need custom tools for users to make content choices inside the text editor, then this article is for you!
This Article
Assumptions
- You have a custom Drupal module
- You can work with Javascript classes
- You can use a package manager like NPM or Yarn
Outline
1. Set Up Your Javascript
Dynamic-link Library
Your package manager can be either NPM or Yarn, but the files must be compiled with Webpack. For CKEditor plugins, we need a compiler that can support a Dynamic-link Library (DLL), and as of this writing only Webpack offers this. So what are DLL's and why do we need them?
Dynamic-link Library is a concept borrowed from Microsoft that allows us to use an external library's API without including that library in our compiled code. DLL's in Javascript are represented as "manifest" JSON files that define the structure of a library: what classes and methods are exported under what namespaces.
With a CKEditor 5 DLL configured in my compiler, I can extend the CKEditor5's core Plugin class without adding the entire core library to my compiled code. Not only is this convenient: faster compiling with smaller compiled files, it is required! Because CKEditor5 is already instantiated in the text editor, any attempt to re-instantiate it with a plugin will throw a duplicated module error.
This isn't unique to Drupal either; all CKEditor plugins need to work inside a pre-existing ecosystem, only adding what's necessary. DLL's allow us to tell the compiler which resources will already be available when our plugin is activated, so the plugin can be applied without conflicts.
Dependencies
As explained in the previous section, we need to add webpack as a dev dependency. We will also need ckeditor5. Note that CKEditor uses two namespaces:
@ckeditor- actual CKEditor codeckeditor5- CKEditor5 Dynamic Link Library
We add ckeditor5 as a dev dependency to access the CKEditor 5 DLL's. Be careful depending on libraries in the @ckeditor namespace as it can result in the duplicated module error discussed above if that code has already been instantiated in the text editor.
Besides those dependencies, the rest is at your discretion. It is recommended to use Terser for code minimization, but not strictly necessary.
File Structure
Let's look at the JS folder structure inside your custom module. This is the structure that Drupal core and other major contributed modules use.
- your_module
- webpack.config.js
- package.json
- node_modules
- js
- build
- yourPlugin.js
- yourOtherPlugin.js
- ckeditor5_plugins
- yourPlugin
- src
- index.js
- src
- yourOtherPlugin
- src
- index.js
- src
- yourPlugin
- build
Webpack Configuration
The beauty of the file structure setup above, is that it keeps our compiling configuration clean and independent from the number of custom plugins and their names. Our compiler can scan the js/ckeditor5 directory for plugins and then compile each plugin folder as a single file. You can look at Drupal's CKEditor5 Webpack configuration as an example.
Start your webpack.config.js file by requiring path, fs, and webpack:
const path = require('path');
const fs = require('fs');
const webpack = require('webpack');
The latter two are used to scan the file directories with this helper function:
function getDirectories(srcpath) {
  return fs
    .readdirSync(srcpath)
    .filter((item) => fs.statSync(path.join(srcpath, item)).isDirectory());
}
Next set up the loop through the plugin file structure to set up the module exports array, which will be a list of our plugins and how to build them.
module.exports = [];

getDirectories('./js/ckeditor5_plugins').forEach((dir) => {
  const bc = { ... }; // configuration
  module.exports.push(bc);
});
Inside the bc configuration object we set the mode key to either 'production' or 'development' depending on your environment. Then the entry key is used to supply the source files of the plugin:
    entry: {
      path: path.resolve(
        __dirname,
        'js/ckeditor5_plugins',
        dir,
        'src/index.js'
      ),
    },
Note that the compiler only looks at the index.js file, so all required classes must stem from exports in that file.
Then on the other side, we have the output key to tell the compiler to build the plugins as CKEditor5 libraries and store them in the build folder:
    output: {
      path: path.resolve(__dirname, './js/build'),
      filename: `${dir}.js`,
      library: ['CKEditor5', dir],
      libraryTarget: 'umd',
      libraryExport: 'default',
    },
Finally we have the plugins key to set up the CKEditor5 DLL:
    plugins: [
      new webpack.DllReferencePlugin({
        manifest: require('./node_modules/ckeditor5/build/ckeditor5-dll.manifest.json'),
        scope: 'ckeditor5/src',
        name: 'CKEditor5.dll',
      }),
    ],
If your node_modules directory is not at the root of your module, you will need to change the manifest path accordingly.
You can see how Drupal uses the optimization, module, and devtool keys to further define the compiler. See the Webpack configuration docs for more information.
Now that the compiler is configured we can run it with either yarn webpack, npm run webpack, or by defining a webpack script in our package.json.
2. Configure Drupal to use your custom plugin
Drupal Libraries
First set up your module's library yaml file to use your compiled plugin:
- your_plugin:
- js:
- js/build/yourPlugin.js: {}
- js:
You may also want to create an "admin library" for your plugin:
- admin.your_plugin
- css:
- theme:
- css/admin.your_plugin.css: {}
- theme:
- css:
What is an admin library? This is a library used in Drupal's text-editor toolbar configuration form:
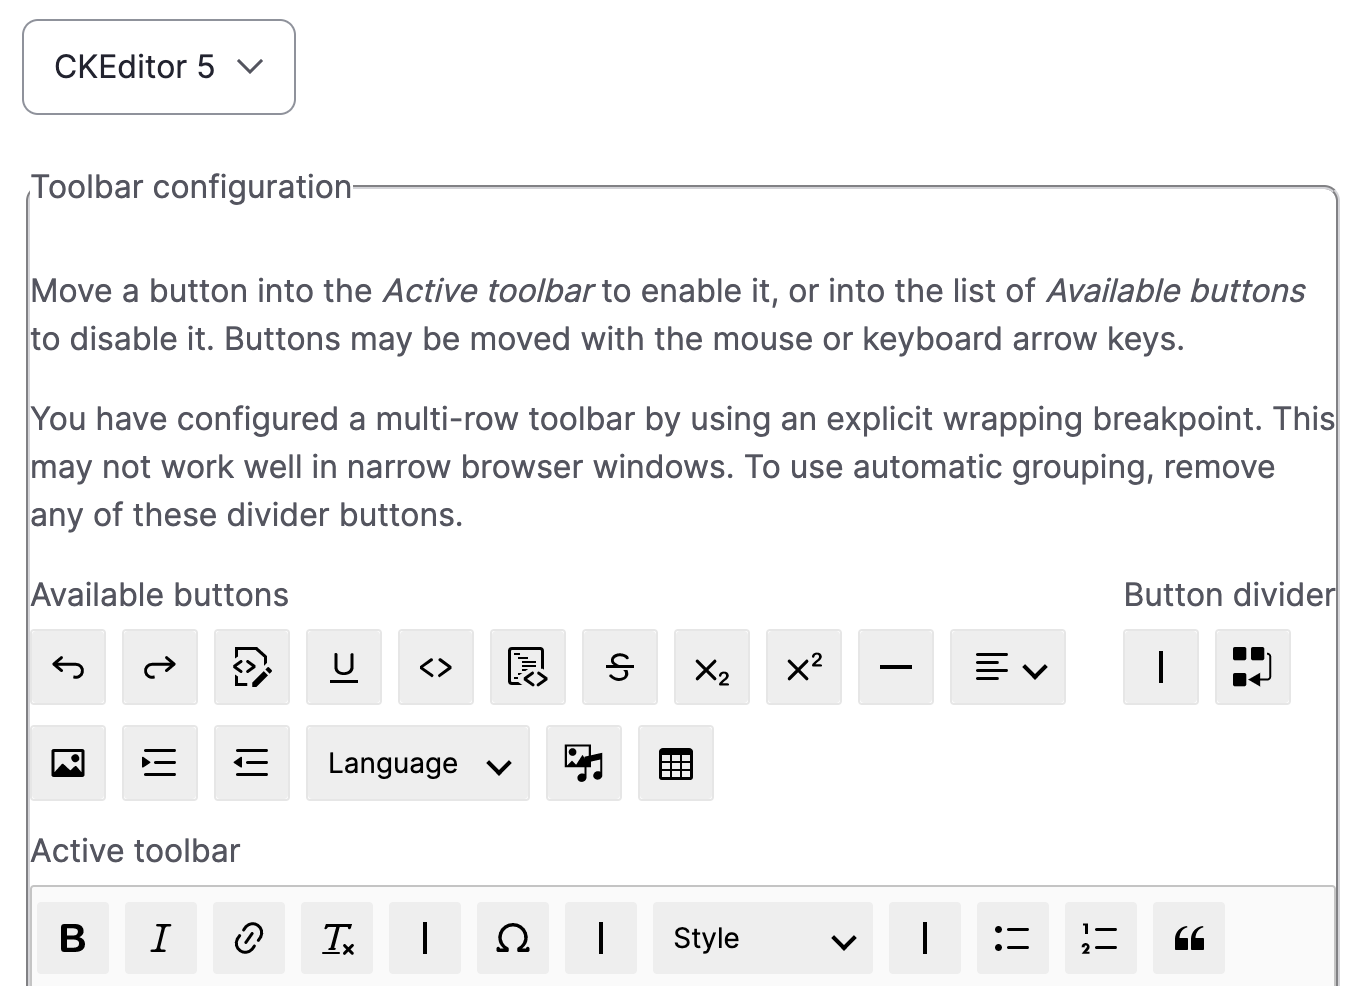
Primarily the admin library tells Drupal what icon your toolbar button should use along with any other styling preferences. Note that this is separate from the actual CKEditor interface set up in your Javascript plugin. Drupal does not parse your CKEditor JS for those styles, so we explicitly set them here for any Drupal admin forms.
CKEditor 5 Yaml
Next create a your_module.ckeditor5.yml file. This file will use Drupal's CKEditor 5 plugin API to make your custom plugin available for CKEditor text editors. For example:
- your_module_your_plugin:
- ckeditor5:
- plugins:
- - yourPlugin.YourPluginClassName
- plugins:
- drupal
- label: Your Plugin's Label
- library: your_module/your_plugin
- admin_library: your_module/admin.your_plugin
- toolbar_items:
- insertYourPlugin:
- label: Your Plugin's Label
- insertYourPlugin:
- elements:
- - <div class="your-plugin">
- ckeditor5:
So what does all this mean? The ckeditor5.yml file is broken into two major sections: Drupal and CKEditor.
CKEditor
On the CKEditor side we describe the plugins we want to add with the format file.class, where "file" is the name of the compiled Javascript file and "class" is the class name of the CKEditor Plugin object exported in your index.js file. Optionally, you can declare editor config within this section using the config key.
Drupal
On the Drupal side we declare the library containing the JS as well as the optional admin library. We also describe our custom toolbar items and the HTML elements that are required for the plugin to function. The latter is used by Drupal's "Limit Allowed HTML" filter, which will automatically allow these required elements when we add the custom toolbar item to an editor. If the toolbar item requires a configuration form inside the text-editor form or dynamic configuration, then a PHP class can be passed using the class key to provide that logic. This PHP class must have a namespace in the pattern \Drupal\{module_name}\Plugin\CKEditor5Plugin\{class_name}.
This gives Drupal all the information it needs to successfully integrate our custom CKEditor plugin into the text-editor form and the CKEditor instance itself.
How to Develop a Drupal SEO Strategy

As the web and its users evolve, so does search engine optimization. It’s important that your website be discoverable by search engines, but it can be challenging to stay up to date with relevant best practices. Learn about the state of SEO today and follow our checklist for increasing organic traffic to your site by making the most of Drupal’s core features and SEO modules.
What is SEO?
Search engine optimization, or SEO, is the practice of optimizing your web content to improve discoverability by search engines—and therefore, your audiences. In the early days of SEO, this usually meant creating a keyword strategy for search queries and building content around those keywords—often using keywords several times in titles, headings and image alt text. This practice, called keyword stuffing, has thankfully declined in popularity due to improved algorithms created by search engines like Google that can detect these gimmick-y tactics and postulate the semantic meaning of website content to match users with the most relevant results. These days, search engine optimization is about high quality content and a technically sound, user-friendly website.
Why an SEO strategy (still) matters for your Drupal website
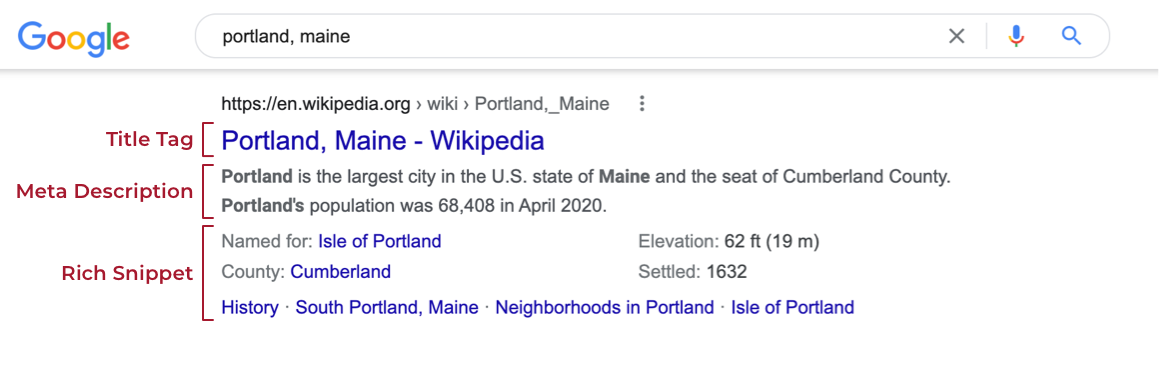
Unfortunately, even after adding unique and compelling content, you may find that your web pages don’t show up on the first page of results. This can be a real blow to your website traffic because research conducted as recently as June 2021 shows that organic search drives nearly half of all traffic to websites—and significantly more if you count local search (e.g., “Pizza restaurants near me” or “Pizza in Portland, Maine”). So if you want to be discoverable to this large source of potential customers and even current users, you need to make sure your content is showing up for relevant search queries.
While search engines have come a long way, they aren’t magical. They still rely on algorithms and data points to determine what constitutes high quality content and a technically sound, user-friendly site. And perhaps most importantly, they don’t know your users as well as you do. By understanding the way search engines like Google work and ensuring your website provides relevant content in the most understandable and accessible ways for your users, you can greatly increase your chances of being discovered in search engines.
An SEO strategy for Drupal
If you’re using a content management system like Drupal, you’ve already laid the foundation for a solid SEO strategy. And if you’ve upgraded to Drupal 9, you’ve got access to easy and flexible content authoring, which is the backbone of a good content strategy, as well as Drupal’s latest features. (And if you haven’t upgraded to Drupal 9 yet, get in touch!)
However, you can do a lot more to make your Drupal website easier for your users and search engines to understand and access. A Drupal SEO strategy should involve technical optimization, thoughtful information architecture, and a robust content strategy. Our Drupal SEO checklist walks you through the most important considerations in each category and makes Drupal-specific recommendations for how to use core modules and which contributed modules to add to your toolkit.
Drupal SEO Strategy Checklist
Technical performance
Responsiveness (optimize for every device): Google uses a mobile-first indexing approach, which means that the mobile version of your content is crawled, indexed, and ranked by Google’s bots. So, even if you don’t think your audience is inclined to use mobile, it’s important that your website is responsive and that your content is well structured on all sizes of mobile phones, tablets, laptops, and desktop computers.
What you should do: With Drupal 9, a basic level of responsiveness is built in. However, this doesn’t mean that the mobile design will look or respond how you imagine it should. Take a look at your website on various screen sizes and devices and ensure that it is 100% viewable and functional for mobile users and that content and features appear in the order you expect. Going forward, take a mobile-first approach to visual and user-experience design.
Page speed: Users expect web content to load almost instantaneously. Recognizing this demand, Google uses a ranking factor called Core Web Vitals to determine how quickly users can access your content. It evaluates things like how long it takes the largest element on your page to load, how much layout shift occurs on a page while it’s loading, and how long it takes for elements on a page to respond to user inputs (e.g., clicks). Your website’s Core Web Vitals directly impact your ranking within Google’s search engine results pages.
What you should do: Continuously audit your website’s performance and identify areas for improvement. You’ll want to work with skilled Drupal developers to ensure that images are compressed, your site’s code is clean, and that unnecessary code is removed. It’s also important to limit redirects and handle any necessary redirects properly. You can use a Drupal module like Redirect to manage, save, and delete redirects from the Drupal administrative interface.
Accessibility: Naturally, if your goal is to make your content discoverable, it’s important that your content is accessible to all users, which means ensuring it can be accessed and understood by users with disabilities and users facing socio-economic restrictions, such as low bandwidth. While Google doesn’t currently take specific elements of the Web Content Accessibility Guidelines into account, many of its “page experience update” metrics added to the algorithm in 2021 have a direct correlation to accessibility. Moreover, it’s likely that search engines will continue to add user experience ranking factors over time, and ensuring that your website is accessible will future-proof your website for algorithms.
What you should do: Drupal 9 has robust accessibility features built in. However, designers, developers, and content editors can introduce accessibility issues if they aren’t careful. It’s important to continually audit your website for accessibility by familiarizing yourself with website accessibility best practices and using tools like SiteImprove that assess your website and provide actionable, prioritized tasks for improving accessibility. A Drupal SiteImprove module enhances the tool for your Drupal site by allowing content editors to see these analyses right from the Drupal administrative interface.
Information architecture & user experience
Navigation: Website navigation is important for SEO because it helps search engines (and people) understand what pages are most important and how they relate to one another. Even if your site relies on a robust internal search experience, web content can be organized through various types of navigational elements such as breadcrumbs (a secondary navigation system that shows a user's location in a site).

What you should do: Ensure that your most important content is no more than 1-2 clicks away from the home page. For instance, if a user navigates from the home page to a blog post by clicking a blog link and then the title of an individual post, that’s two clicks. Then, use a Drupal module such as Easy Breadcrumb or Menu Breadcrumb to automatically generate breadcrumbs on every page of your site. Additionally, you may want to use a module like Pathauto to automatically assign structured, user-friendly URLs to your Drupal nodes.
Link management: Links are the backbone of the web. When search engines “crawl” your site, they follow links from known pages to discover additional pages. That means if your links are broken, search engines won’t be able to find or serve your pages. Broken links also mean that users won’t be able to see your content—a frustrating experience that ultimately hurts your site’s discoverability.
What you should do: For link management, use a Drupal module like Link Checker to scan your site for broken links. The module provides a report of broken links on your site and can be configured to run periodically or even to unpublish nodes after a specified number of 404 (page not found) errors. To prevent broken links from occurring in the first place, try using a module like Linkit that gives content editors an autocomplete field for linking content in a WYSIWYG editor, reducing the likelihood of mistyped or outdated URLs. You may find ahrefs.com a useful resource as well, which offers a lot of link management reports we use with all Redfin clients.
Site maps: A XML sitemap is a collection of all the important pages on your site that are meant to be crawled by search engines. It acts as a roadmap to tell search engines where to start. It’s especially beneficial for large websites and new websites that have fewer backlinks (links from external sources).
What you should do: General a sitemap using the Simple XML sitemap module. This sitemap tool supports multilingual content and covers most of Drupal’s core entity types (e.g. nodes, taxonomy terms) out of the box. It also automatically submits your sitemap to search engines.
On-page optimization
Semantic structure: The semantic structure of your content is a big deal for search engines, as well as for users. Like users, search engines rely on “clues” to determine content hierarchy, context, and relationships. However, search engines can’t rely on some of the visual clues that some users respond to. Instead, the HTML markup provides these semantic clues. For instance, an <h1> tag tells a search engine that the content contained within that tag is a top-level header and an <a> tag defines a hyperlink. Without correctly applied markup, a search engine will just “see” a bunch of text.
What you should do: Ensure that your web developers are using best practices for writing clean, accessible code. Then, make sure that content editors inserting code via WYSIWYG editors are aware that headings and other tags—often misused to convey emphasis—have important semantic meaning to users and search engines alike. Following our guide to writing accessible content in a content management system is a great place to start!
Metadata: Meta tags and descriptions are often seen as near synonymous with SEO. Meta tags are structured content descriptions that tell search engines and social networks, such as Facebook or Twitter, important information about your web page. The title tag and meta description attribute are the most commonly used by search engines.
What you should do: Use the Metatag module to set tags like page title and description, as well as the image to be used when a page is shared on Twitter or Facebook. A great feature of this module is that you can set default tags for all items of a certain type. For instance, you could set the blog post title tag to always display “[Current page title] | [Site name]” (e.g. “The Drupal 9 SEO Checklist | Redfin Solutions, LLC”) and the description to pull the value of a particular field on that content type, such as a summary or subtitle field. To go beyond these basic metatags, you can also use the Schema.org Metatag module to further define structured data for your content according to Schema.org’s schemas for structured data on the Internet.
Content strategy
Know your audience (and write for them): The most important aspect of any content strategy is to know your audience—and to develop content for them based on that knowledge! If you want to show up in the search results for your target audiences, the first step is to know what it is they’re searching and why.
What you should do: Develop a plan for your content based on user research and existing personas and user journeys. After coming up with some topics, conduct some queries of your own and see what Google offers for related queries. Pay attention to what type of content your competitors are creating and how it shows up in search results. Gather data from Google Analytics about your traffic sources and mediums so you have a benchmark for determining how you’re acquiring traffic. Continue to track this over time as you hone your strategy.
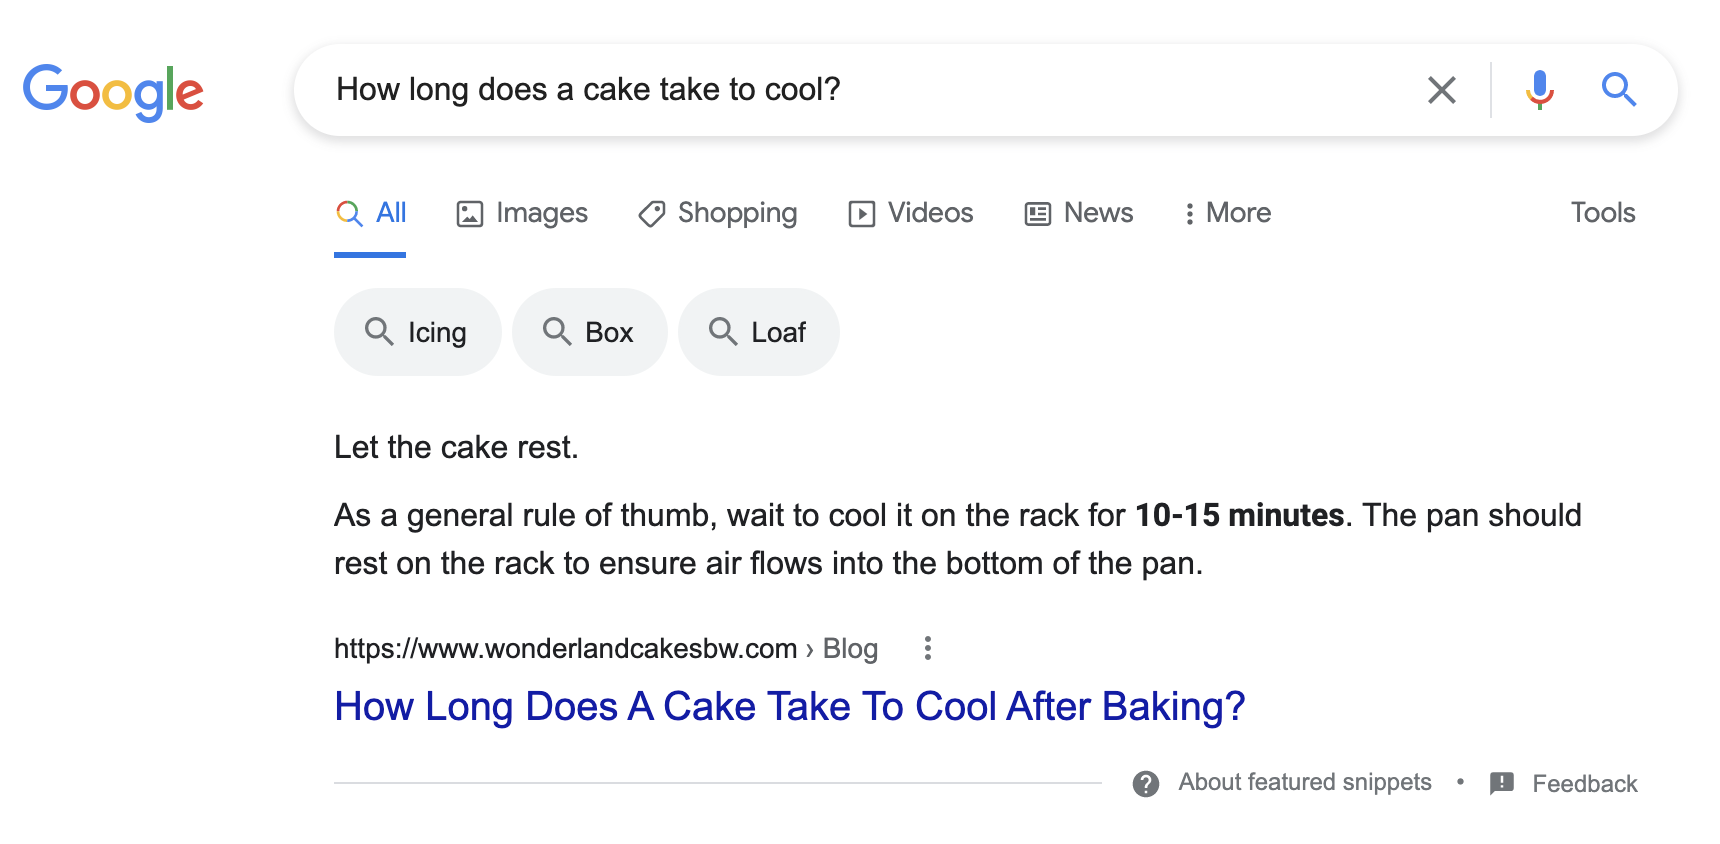
Answer questions: Have you ever typed a question into the Google search box and been provided immediately with an answer before scrolling down to the full search results page or clicking a link. For example, try typing “How long does a cake take to cool?” into your search bar. If you were served a bit of text letting you know that as a general rule of thumb you should let your cake cool for 10-15 minutes, you witnessed a “featured snippet." While the jury is still out on whether featured snippets are the best search solution, Google’s latest algorithm, the Multitask Unified Model (MUM) makes it clear that Google aims to help users by answering complex questions.
What you should do: This one dovetails with knowing and writing for your audience. Write content that directly answers your target audience’s questions. There’s no guarantee that Google will pull your content for a featured snippet. However, you’ll still be tapping into the mental model that Google has identified for how users expect to search for and find content.
(Re)fresh content: It can take time for your content to build up its authority and reputation (sometimes referred to as “link equity”) with search engines. Unless you’re a news publishing organization, your top content probably needs to gain credibility through links from other sources. Therefore, it’s important to keep your older content relevant, so you can take advantage of the equity it has built up over time.
What you should do: Make a list of last year’s top performing pages and see if there’s anything that should be updated to reflect new insights or timely changes. These don’t have to be large changes. Just keep your content fresh and remember not to change the page path (URL) if you don’t have to. If changing the page path is necessary, use the Redirect module to ensure a redirect is set up correctly.
Conclusion
In 2022, it’s more important than ever that your SEO strategy include elements like information architecture and user experience alongside general technical optimization and quality content. Thankfully, in the right hands, your Drupal website can handle it all.
If you need help devising your SEO strategy, upgrading your website to Drupal 9, or taking advantage of some of the Drupal modules outlined here, contact the Redfin Solutions team!
Accessible Website Design and Why It Matters

Accessible website design ensures that all users—including those with disabilities and limited access to the internet—can benefit from your website’s services and share in equitable access to information. After all, it’s important that the people who view your website can complete tasks that align with your organization’s goals—whether that’s to register for a class, purchase a product, or make a donation. The Web Content Accessibility Guideline (WCAG) is an internationally recognized set of guidelines that can help ensure your website is adhering to accessibility best practices.
The state of website accessibility
Research conducted by WebAIM, a leading nonprofit organization based at the Institute for Disability Research, Policy, and Practice at Utah State University, found that 97.4% of home pages evaluated contained accessibility errors in 2021. You may be wondering how many users are affected by these errors. Put simply, the answer is a lot.
More than 14 percent of adults in the U.S. experience difficulty hearing and more than 16 percent have vision impairments, according to the CDC. Even before accounting for disabilities related to motor skills or cognition, this means tens of millions of people in the United States alone may be blocked from engaging with your content or finding the information they need on the internet.
Additionally, people may experience a “temporary disability” due to environmental conditions (e.g. poor lighting). It is likely that as we age, all of us will experience some form of disability. Moreover, different devices and internet connection speeds can affect one’s ability to access content. Accessible website design truly benefits all of us and helps create a more equitable society.
WCAG compliance and the ADA
WCAG is developed by the World Wide Web consortium (W3C) in coordination with organizations all over the world. The goal of the guidelines, as stated by W3C, is to provide “a single shared standard for web content accessibility that meets the needs of individuals, organizations, and governments internationally.”
WCAG documents provide a number of success criterions that a webpage must “pass” to be considered accessible. These criteria are broken down into four categories: perceivable, operable, understandable, and robust. There are currently two versions of WCAG (2.0 and 2.1) and three levels: A, AA, AAA. WCAG 2.2 is expected to be published before 2022 and will include all the elements of the previous versions, with new proposed success criteria added.
In the United States, digital accessibility is protected by the American Accessibilities Act, or ADA. While there is not yet a federal law dictating a specific WCAG mandate for website ADA compliance, many lawsuits have been successfully fought against owners of web properties for failing to meet the needs of people with disabilities. For instance, lawsuits brought by the National Association of the Deaf against MIT and Harvard culminated in 2020 with both universities legally consenting to provide high-quality captions for all online video content. After the Covid-19 pandemic hit, lawsuits against educational institutions skyrocketed as it became clear that people with disabilities could not adequately access educational content online and that the issue was urgent.
What makes websites accessible
Website accessibility revolves around four user-centered principles: they must be perceivable, operable, understandable and robust. These principles are sometimes referred to using the acronym POUR. Each principle is explained below, along with examples of how the principle applies to website design and development.
Perceivable
The “perceivable” principle states that information and user interface components should be presented to users in ways that they can perceive. For instance, the criterion that text alternatives must be provided for any non-text content falls under this rule. You may already be aware that most images need to be accompanied by alternative text content that accurately describes the content to users who cannot see the screen. Similarly, input fields must be labeled or named programmatically so that the field can be identified by a screen reader or other assistive technology.
The perceivable rule also dictates that color plays an important role in accessible website design. While color cannot be the only means of conveying information or indicating an action, minimum color contrast plays an important role in the visual presentation of text. Many websites use color schemes that aren’t perceivable by people with impaired vision, including many types of colorblindness. In order for most text to be considered compliant, it must have a contrast ratio of 4.5:1. Luckily, website designers can use a number of tools to determine exact color contrasts and develop effective, accessible color palettes.
Operable
In order for a website to be “operable,” its user interface and navigation components must be functional for all users. A large component of operability is keyboard accessibility. Content that is operable only through mouse clicks will not be usable for folks who cannot use a mouse. And while some folks may not be able to use a standard keyboard, most adaptive technologies emulate the keyboard. This makes keyboard accessibility important to provide access to people with motor disabilities, people who are blind, and people with conditions such as tremors.
The operability principle also applies to the ways that users find and navigate content on your website. Many people don’t realize the importance (or existence!) of semantic structure in websites. Semantic structure—implemented through HTML elements such as regions, headings, lists, and ARIA specifications—is essential to helping users with and without disabilities get the information they need from your website. It is particularly important to folks using assistive technologies, such as screen readers, so that they don’t have to comb through every word on the site to find the content they need.
Understandable
The “understandable” principle speaks to a user’s ability to understand the user interface and the information it contains. This principle includes elements of design, development, and the content itself. For instance, one component of understandability is readability. This includes publishing content at the lower secondary education level and providing mechanisms for identifying jargon words (or avoiding them altogether!) and abbreviations.
In addition to the readability of text, an interface must be predictable and offer input assistance to help users avoid and correct mistakes. This includes making sure elements that perform the same function are labeled consistently and appear in the same order, where relevant. For instance, a button labeled “Previous page” should not be labeled “Go back” in another location. These types of labels are most often implemented programmatically by developers as they create your website. Similarly, error prevention, such as letting a user know when a form input isn’t valid or a field, is required as part of what makes a website understandable.
Robust
To be considered technologically “robust,” an interface must be able to be interpreted reliably by a wide variety of “user agents” — mainly browsers and assistive technologies. One of the main elements of robustness is called parsing, which means that mark-up languages such as HTML must be formatted and nested according to proper specifications so that they can be properly analyzed and interpreted by these user agents. A simple extra quotation mark or forgotten angle bracket could make a web page programmatically unreadable.
Another important consideration for robustness is the implementation of status messages. This criterion states that status messages should alert users without interrupting the workflow of a user of assistive technology. For instance, if a user is scrolling through a social media feed when an alert message pops up, the user should be made aware of the alert without the focus (the input area of the screen that receives keyboard input) shifting.
Focus on accessibility, every step of the way
To ensure that websites meet the needs of all users and are WCAG compliant, it’s important to prioritize accessible website design every step of the way—from user experience research to content entry. Here’s an overview of the type of accessibility work that happens throughout the web design and development process.
User experience research
User experience (UX) research is the study of end users and their requirements and wishes. While much user experience research is conducted before a project even begins, the UX project should be iterative — with a testing and feedback cycle that continues even after a website is launched. Accessibility should be taken into account from this early stage in identifying the needs of the users. This can be done by incorporating users with disabilities in the research, building accessibility considerations into personas and user stories, and testing prototypes at various stages using assistive technologies.
User experience design
The UX design process—to include information architecture (organization) and interaction design—can help head off accessibility concerns down the road by ensuring that simplicity, consistency, and user needs are the backbone of a website. At this stage, accessibility can be built in by establishing consistent navigation, metadata, and taxonomies, planning for consistent UI components to be used across a website, and determining the hierarchical and semantic structure of web page templates.
At this stage, designers also consider how to convey information and offer user input across different devices, develop alternatives to motion for alerts and emphasis (which can cause harm to people with certain conditions), and ensure that a meaningful linking strategy is employed to avoid the use of inaccessible “click here” links throughout a website.
Visual design
In the visual design stage, the perceivable principle takes center stage. Visual designers develop accessible color pallets, decide on typefaces and font sizes for various user interface elements, and ensure element selection and alerts are conveyed without color alone.
Visual designers also play a role in consistency (an important feature of the understandable principle) by ensuring the consistent patterns built into the information architecture are conveyed graphically.
Development
The development stage is where the bulk of accessibility implementation happens. It’s at this stage that mark-up elements are created and formatted according to specifications with proper names and labels. CSS is used to implement accessible styles, responsive designs, and media queries, and create interactivity with scripting languages. Developers build in keyboard accessibility so that any interactivity, any action a user can take using a mouse, can also be performed with a keyboard or device that uses keyboard inputs.
Developers can also implement Web Accessibility Initiative – Accessible Rich Internet Applications, better known as WAI-ARIA or simply ARIA. This framework helps assistive technologies properly interpret interactive website components (e.g. sliders or accordions) by providing additional attributes.
Content entry
Entering accessible content into a content management system, such as Drupal, is the final step. This includes ensuring images and non-text images have helpful alternative text, using headings in the proper order, and providing high-quality captions and/or transcripts for audio/video content. Learn more about writing accessible web content on our blog from one of our designers.
Feeling overwhelmed? Get in touch!
If you’re new to accessible website design or WCAG compliance, this might seem like a lot to keep in mind! At Redfin Solutions, we pride ourselves in meeting our clients where they are, and we’re here to help with important web considerations like accessibility.
If you’d like an accessibility audit on an existing web property or are interested in starting an new accessible project, get in touch!
Upgrading Drupal 7 to Drupal 9: What to expect

As a Drupal 7 user or website owner, it’s important to understand what’s next for your web presence as Drupal 7 and Drupal 8 reach their respective end-of-life. While learning that your Drupal version will no longer be supported can seem scary, you’re certainly not alone in the upgrade process. Drupal users, administrators, and developers all over the world are migrating their websites to the latest version of Drupal.
At Redfin Solutions, we’ve helped nearly all of our clients complete major Drupal upgrades, from 7 to 8 and 7 to 9—and the rest of our clients have upgrades scheduled. This guide will help you understand what to expect so that you can plan accordingly and get a sense for the resources you’ll need to allocate to upgrade Drupal 7 to 9.
Why upgrade Drupal 7 to Drupal 9
First things first: why is a Drupal 7 to 9 upgrade even necessary? In short, Drupal 7 will soon cease to be supported and upgrading to Drupal 9 will ensure your website uses the most secure Drupal code. It will also give you access to exciting new features such as the Layout Builder module for easily creating visual layouts with a drag-and-drop interface, out-of-the-box multilingual capabilities, and the ability to quickly make small content changes without navigating to the edit page.
Drupal 7 will reach its end-of-life in November 2023. Drupal 8 introduced a paradigm shift in configuration management, coding methodology, and theming (the way a website is styled). However, the differences between Drupal 8 and Drupal 9 are minimal. For this reason, the Drupal community originally recommended migrating incrementally from 7 to 8 and then 8 to 9. However, an extension of Drupal 7 support due to the Covid-19 pandemic shifted timelines around. Now, Drupal 8 is actually reaching its end-of-life before Drupal 7, on November 2nd, 2021. With this in mind, it makes sense for many Drupal 7 websites to upgrade directly to Drupal 9.
What is unique about this upgrade
Unlike past Drupal upgrades, a lot is changing when you go from 7 to 9. While these changes are widely seen as improvements for developers, content creators and end users alike, it means an upgrade from Drupal 7 to Drupal 9 could require more time and resources than other upgrades. To upgrade from Drupal 7 to any newer version of Drupal, a website needs to be almost entirely rebuilt — there is no upgrade “button,” unfortunately. Rather than porting over themes and custom modules, developers may have to write a lot of new code to get a site up and running on Drupal 9. But don’t worry—this doesn’t mean you’ll have to rewrite every blog post and staff bio! Most content can be migrated relatively seamlessly by an experienced Drupal developer.
Drupal upgrade considerations
To determine how large of a project your Drupal 7 to 9 upgrade will be, take some time to think about the following factors that are likely to affect project scope.
The size and complexity of your website
This one might seem like common sense: The larger and more complex your website is, the more resources will be needed to recreate it on Drupal 9. Determining the size of your website should be relatively simple. You can get a count of the number of nodes or pages your site contains by exporting pages from Drupal, consulting your XML sitemap, or using Google Search Console to see the number of pages crawled for tracking by Google. If you’re unfamiliar with administering your site, a developer can help you determine this by running reports that group the amount of content per type.
Determining the complexity of your site can be a bit more challenging, but it’s also likely to carry more weight in determining the scope of your upgrade. Generally speaking, the number of content types, taxonomies, views, modules, and custom fields your site uses will greatly affect the developer time needed for the upgrade. For instance, if your website has 15 content types, each with their own unique data fields and designs, a developer will need to recreate and then restyle each of those page templates. Some other complexities may include faceted search indices that allow users to apply filters to specific types of content, multilingual features, and custom modules or other custom code.
The Drupal modules you currently use
As mentioned in the last section, custom modules will require significantly more resources to upgrade than contributed or core Drupal modules. This is worth repeating because custom modules will need to be entirely rebuilt in the new Symfony framework (the back-end PHP framework that’s used in Drupal 8 and beyond) and because migrating the content in custom modules is itself a time consuming task that’s necessary to ensure no content is lost.
However, even “standard” Drupal 7 modules may not migrate seamlessly to Drupal 9. Modules that you currently use may not yet be supported on Drupal 9, or they may have been discontinued altogether in favor of newer modules that better conform to today’s best practices. If this is the case, time will be spent to determine what Drupal 9 modules can take their place.
Your required website integrations
Does your website have a reservation system that is connected to third party software? Perhaps you use a calendar integration or have data that maps directly to a CRM like Salesforce? Knowing what integrations your site needs to support, how flexible you’re willing to be with third-party software, and how customized your integrations are (i.e. is there an API module used “out of the box” or was custom code written to sync data from one platform to another?) will help you determine whether integrations will significantly affect the scope of your upgrade.
Your ideas for a refresh or redesign
With an upgrade from Drupal 7 to 9, a website rebuild is guaranteed. However, how many changes you make to your website at the time of the upgrade is up to you. Consider whether a website redesign or a refresh is appropriate for your brand and your budget.
Many companies and organizations use the upgrade as an opportunity to audit, refresh, or even entirely redesign their website. While incorporating a redesign likely means allocating more resources, it also means getting the most value for your time and money while you’re already “under the hood,” so to speak. Even if you don’t opt for a full redesign at the time of your upgrade, it’s a good idea to audit your site and determine if there are any outdated features, functionalities, or content that simply don’t need to be migrated or could be implemented more efficiently.
How to get started with your upgrade
The first step in any upgrade is to take stock of your current website. This should involve an audit of your modules, content, and important features. Next, you’ll want to start thinking about your roadmap for the future. For instance, is now the right time to consider a redesign? What organizational goals or plans may affect your upgrade timeline?
If you need help getting started with an audit or strategizing for the future of your site, get in touch with the Redfin Solutions team today to start planning your Drupal upgrade!
How to Find the Right Drupal Web Design Agency

Whether you’re launching a completely new Drupal website or it’s time to consider redesigning an outdated website, the prospect of finding the right web design agency can feel like a daunting process. However, to meet your business goals and users’ needs, choosing the right firm is an important step.
Drupal excels at providing an easy content authoring experience for complex websites. You’ll want to make the most of its scalability and flexibility by working with web designers and developers that understand Drupal design. Here are some key aspects to keep in mind when thinking about your Drupal design process, looking for a Drupal web design agency, and making sure you can recognize red flags.
What to know about Drupal design
It's not (quite) a blank slate for designers
It’s true that Drupal is highly flexible. You can customize almost everything on your Drupal website, from layouts and colors to content organization and integrations. However, it’s important to keep in mind that as a content management system (CMS), Drupal relies on some standard “building blocks” to allow for quick and consistent content authoring. Every Drupal website has a Theme, or a collection of files that define the presentation of your website. In addition to standard assets like CSS and Javascript files, some of these are Drupal-specific files. For instance, Drupal regions must be added to a theme to control where the content is displayed and how the page is marked up in HTML. It’s necessary for Drupal web designers to understand the basic mechanics of a Drupal website and understand how design concepts will translate into Drupal development.
Design is component based
If you’re following recognized best practices for scalable web design and development, you’ll want to think about your Drupal design in terms of components rather than just pages. In practice, component-based design (also called Atomic Design) means that designs are broken down into smaller component parts that can be combined and rearranged in a number of ways to create different page templates. For example, your smallest components may include buttons, labels, and input boxes. These components always look the same, but they can be re-used and rearranged to create search bars, sign-up forms, or calls to action. These elements can then be combined with others to create larger elements such as headers or modals.
While component-based design is popular across the web, it’s especially important for Drupal websites in order to take advantage of the flexibility and scalability Drupal offers while maintaining consistency and easy content authoring across a complex website. Drupal 8 has modules such as Layout Builder (included with the Drupal Core distribution) and Paragraphs that make implementing component-based design much easier than it’s been before.
Your information architecture matters
When you think of a website design, visual elements like colors, images, and typography probably come to mind. These visual components are undoubtedly important, but it’s likely that the information architecture underlying the visual design is just as important—if not more important—to helping users find content and maintaining an attractive, consistent, and user-friendly website. Some ways that information architecture is manifested include site maps, hierarchies and categorizations (i.e. taxonomies), navigation, and metadata.
Choosing the right Drupal web design agency
Now that you know the basics of what designing a Drupal website entails, how do you find the right agency for the job?
Look for Drupal design examples
Often, the most sure-fire way to see whether an agency has the Drupal design experience you’re looking for is to check out the other work they’ve done. Think about the different features of your web design project that are the highest priority or may be unique to your website and make sure the agency you hire has a track record of success on similar projects. For instance, if you’re redesigning a website for a university office, you may look for companies that have previously designed higher education websites. Or if your website needs a reservation system, check if the agency you choose has experience integrating websites with reservation software and constituent relationship manager (CRM)s. Of course, you’ll want to ensure the examples you see are from Drupal websites!
Ask about the design process
If you’re unsure about an agency’s design process or it’s not clear in their proposal, it’s more than okay to ask! The agency you choose should have an established “Discovery” phase devoted to understanding your business goals and your users. This might involve creating user personas or defining the key tasks you expect users to be able to accomplish on your website. You may also want to gain clarity about what design deliverables they’ll provide. Depending on the size and scope of your project, this might involve sitemaps, user journeys, wireframes, or design mocks, for instance. Most importantly, ensure that the design process is user-centered.
These days, it’s a good sign if an agency follows an agile approach to design—meaning work is conducted iteratively in two week increments called sprints. The Agile methodology allows stakeholders to provide more feedback and re-examine goals as the project moves along. You can also ask about how designers and developers at the agency work together. A good rapport and established workflow between designers and developers goes a long way toward ensuring your final product looks like the mocks a designer shows you.
Check out their involvement in the Drupal community
The best way to tell whether an agency has real Drupal credentials is to take a look at their involvement in the Drupal community. If they’ve contributed code to Drupal modules or have played a part in organizing Drupal events, it’s likely they’ve committed to keeping up with best practices for designing Drupal websites. At Redfin Solutions, for instance, we regularly sponsor Design 4 Drupal, Boston, an annual conference devoted to design, UX, and front-end development for Drupal websites.
Assess their communication style
Remember, you’re going to be working closely with the web design agency you choose. Beyond technical skills, it’s important that a web design agency prioritizes communication skills and customer service. Even the most genius tech wizards are only as good as their ability to communicate with you and listen. After all, it is your website.
Red flags: what to look out for
Don’t get caught off guard when it’s time to launch your website. Keep these red flags in mind when you’re choosing an agency to ensure a successful project.
Avoid designers who don't know Drupal
There are many great web designers out there that aren’t familiar with Drupal. You should avoid them if you’re building a Drupal website. This isn’t because their designs won’t look great on Drupal—it’s because there’s a good chance they won’t know how to implement them in a Drupal environment. This applies to any software or content management system. Choosing a web design agency that specializes in the platforms that your website uses will ensure you get the most out of the technology you’ve got.
Beware an inadequate discovery phase
In an attempt to provide you with the lowest quote possible, a design agency might nix or skimp on the discovery phase. But without this essential first step in the process, an agency can’t possibly build a user experience that delights your users and helps you achieve your business’s specific goals. When it comes to Drupal design, context is everything. Make sure the agency you choose for your project takes the time to understand the environment in which you operate rather than just churning out websites factory style.
Steer clear of agencies that don't mention accessibility
If a proposal from a web design agency doesn’t mention how they’re addressing web accessibility or usability, you should consider this a red flag. Following accessibility standards in design and development allows users with disabilities, such as visual impairment or limited mobility, to access your content—and helps everyone find the information they’re looking for. Depending on your website’s domain, it may even be legally required that your website meet WCAG criteria. When it comes to accessibility, there are no shortcuts.
Conclusion
Keep these tips in mind when you’re ready to find the right Drupal agency for you and your website. To learn more about user-centered web design for Drupal websites, visit our blog or contact us to see how Redfin can help!
Migrate Drupal WYSIWYG to Paragraphs

In November 2022, the Drupal community and the Drupal Security Team will end their support for Drupal 7. By that time, all Drupal websites will need to be on Drupal 9 to continue receiving updates and security fixes from the community. The jump from Drupal 7 to 9 is a tricky migration. It often requires complex transformations to move content stuck in old systems into Drupal’s new paradigm. If you are new to Drupal migrations, you can read the official Drupal Migrate API, follow Mauricio Dinarte’s 31 Days of Drupal Migrations starter series, or watch Redfin Solutions’ own Chris Wells give a crash course training session. This blog series covers more advanced topics such as niche migration tools, content restructuring, and various custom code solutions. To catch up, read the previous blog posts Drupal Migration Basic Fields to Entity References and Migration Custom Source Plugin.
So the Drupal 7 website you’ve been tasked with upgrading to Drupal 8 has WYSIWYG fields filled with various images, videos, iframes, and tables all with inconsistent formatting. You want to take advantage of this upgrade by switching to a more structured content editing system like Paragraphs, so all those special cases will have a consistent editor experience and display. There is too much content to do this manually, so you need an automated migration. But to impose all this structure, you need to intelligently divide ambiguous content into your specific destination paragraphs. This is a difficult migration task for a few reasons.
- There are multiple paragraph types, so they can’t share one migration.
- The original WYSIWYG content can be broken into several paragraphs of several of different types, but the Drupal migration API wants one source entity to become one destination entity as discussed in this blog post.
- The destination node needs to reference the paragraphs in the exact order as the original content.
These are tricky situations without a widely agreed upon solution. There are some custom migration modules that could help like Migrate HTML to Paragraphs. However, they may not fit your exact guidelines, especially if your paragraphs are referencing further entities like media or ECK entities. So how do you handle this?
There is no perfect solution. That said, one recipe for success is to write a custom process plugin that breaks up the WYSIWYG content, creates the correct paragraphs on the fly (as well as any file/media/ECK entities), and returns the paragraph IDs in the correct order for the destination node to reference. But beware: these paragraphs can’t be rolled back or updated through the migration pipeline. This makes testing more difficult because running a migration update is no longer idempotent, which means running it multiple times in a row will stuff the database with orphaned paragraphs. This simplifies the whole problem to one custom plugin. Here, the credit belongs to Benji Fisher for the starting point code. Keep in mind there are two shortcomings with this code that we will resolve later on.
Let’s break it all down. The first step is to import the WYSIWYG data into a DOMDocument in order to programmatically analyze the HTML. The DOMDocument is a data tree where each HTML tag is represented as a DOMNode that references any tags inside of it as children. You want to split up this DOMDocument so that each piece of content gets neatly mapped into the best fitting paragraph type. Since most of the content is simple text, the text paragraph type will be the default. So you need to test each piece of content to see if it matches a different paragraph type like image, video, or table. If it doesn’t match any of them, then you can safely drop it into the default text paragraph. You should start this process by iterating through all the top-level DOMNodes. For example:
<div class="wysiwyg-container">
  <div class="top-level">
    <p class="text"></p>
  </div>
  <div class="top-level">
    <img class="image" />
  </div>
  <div class="top-level">
    <p class="text"></p>
  </div>
  <div class="top-level">
    <table class="table"/>
  </div>
</div>
When you start with the wysiwyg-container div, you will see four direct children with the top-level class. Starting with the first child, test for each special case. One of the advantages of using a DOMDocument is that you can use the getElementsByTagName function to ask any DOMNode if it has children tags like img, table, or iframe. On a match, turn all the content in the branch to a new paragraph. Otherwise, put each chunk of consecutive text into a new text paragraph. Here lies the first problem with Benji’s template: branches with mixed content.
Most of the time this isn’t an issue. If there’s a table inside a div, you probably want the entire div for your table paragraph. However, if there’s an image inside an anchor tag, your image paragraph will grab the image data but ignore the link, losing data along the way.
{# Top level tag #}
<div class="top-level">
  {# Link around image #}
  <a>
    {# Image #}
    <img />
  </a>
</div>
This may be an acceptable loss, or an issue that can be flagged for manual intervention. Otherwise, you’ll need a method that can recursively traverse an entire branch of the DOMDocument, cherry-pick the desired HTML element, and put the rest into the default bucket.
For instance:
  /**
   * Recursively navigate DOM tree for a specific tag
   *
   * @param $post
   *   The full page DOMDocument
   * @param $parent
   *   The parent DOM Node
   * @param $tag
   *   The tag name.
   * @param string $content
   *   The content string to append to
   *
   * @return []
   *   Return array of DOM nodes of type $tag
   */
static protected function recursiveTagFinder($post, $parent, $tag, &$current) {
  $tagChildren = [];
  // Iterate through direct children.
  foreach ($parent->childNodes as $child) {
    // DOMText objects represent leaves on the DOM tree
    // that can't be processed any further.
    if (get_class($child) == "DOMText") {
      $current .= $post->saveHTML($child);
      continue;
    }
    // If the child has descendents of $tag, recursively find them.
    if (!is_null($child->childNodes)
      && $child->getElementsByTagName($tag)->length != 0) {
      $tagChildren += static::recursiveTagFinder($post, $child, $tag, $current);
    }
    // If the child is a desired tag, grab it.
    else if ($child->tagName == $tag) {
      $tagChildren[] = $child;
    }
    // Otherwise, convert the child to HTML and add it to the running text.
    else {
      $current .= $post->saveHTML($child);
    }
  }
  return $tagChildren;
}
If a top level DOMNode indicates that it has an img tag, then this method will search all the DOMNode children to find the img tag and push everything else into the default text paragraph, the $current variable. There will likely be some disjointed effects when pulling an element out of a nested situation: a table may lose special formatting or an image may not be clickable as a link anymore. Some issues can be fixed in the plugin. In the migration, I checked if any img tags had an adjacent div with the caption class and stored that in the caption field on the paragraph. Again, others may need to be manually adjusted, like reordering paragraphs or adjusting a table. Remember that it’s much faster to tweak flagged migration content than to find and fix missing data manually.
On to the next issue, let’s dig into embedded media in Drupal 7. The tricky aspect here is that the media embed is not stored in the database as an image tag, but as a JSON object inside the HTML. This requires a whole new set of tests to parse it out. To start, check each DOMNode for the opening brackets of the object [[{ and the closing brackets }]]. If it only contains one or the other, then there isn’t enough information to do anything. If it contains both, then get the substring from open to close and run json_decode. This will either return an array of data from the JSON object or null if it’s not valid JSON. The data in this array should contain an fid key that corresponds to the file ID of the embedded image. That file ID can then be used to grab the image from the migration database’s file_managed table and create an image paragraph.
Those are the main gaps in Benji Fisher’s custom source plugin. Of course each implementation requires even more tweaks and data manipulations to get the exact migration to work correctly. Some content simply will not transfer cleanly, so remember to test thoroughly and stay in tight communication with your client in order to turn WYSIWYG chaos into neat paragraphs.
If you found this migration series useful, share it with your friends, and don’t forget to tag us @redfinsolutions on Facebook, LinkedIn, and Twitter.
Drupal Migrate Basic Fields to Entity References

In November 2022, the Drupal community and the Drupal Security Team will end their support for Drupal 7. By that time, all Drupal websites will need to be on Drupal 8 to continue receiving updates and security fixes from the community. The jump from Drupal 7 to 8 is a tricky migration. It often requires complex transformations to move content stuck in old systems into Drupal’s new paradigm. If you are new to Drupal migrations, you can read the official Drupal Migrate API, follow Mauricio Dinarte’s 31 Days of Drupal Migrations starter series, or watch Redfin Solutions’ own Chris Wells give a crash course training session. This blog series covers more advanced topics such as niche migration tools, content restructuring, and various custom code solutions. To catch up, read the previous blog posts Custom Migration Cron Job, Migration Custom Source Plugin, and Connecting a Transact SQL Database to Drupal.
Migrating from Drupal 7 to Drupal 8 often requires restructuring your content, like transforming an unlimited text field into paragraphs or a list text field into a taxonomy reference. The tricky part is that the migration pipeline wants each source entity to go to one destination entity, but each paragraph or taxonomy term is a new entity and a single node can reference several of these.
So how do you break up data from one entity and migrate it into multiple entities?
Manual entry
If there’s a small set of old content or you’re already manually adding new content, then manual entry is a viable solution, but it shouldn’t be the default for large migrations. Going this route, you want to set up content editors for easy success. If possible, reduce the number of actions needed for a repeated task. With some clever string concatenation in your query results, you can create exact links to all the node edit pages that need updating. This is much easier than giving someone a node id or page title and asking them to fix that page. Just because it’s not an automatic migration, doesn’t mean we can’t automate aspects of it.
CSV Importer
The CSV Importer module is useful for simple data that already exists in a CSV file or can be quickly exported as a CSV file. For example, a spreadsheet with hundreds of country names could easily be imported as taxonomy terms with this tool. Or a list of emails and names could be imported as Users. Once you’ve migrated your data, you can reference them in other migrations using the static_map plugin or a custom process plugin to lookup the correct entity reference. Be careful not to abuse the static_map plugin with hundreds of mappings. In the country example, if the source data contains the name of the country that you want to reference in the destination, you could write a process plugin that gets the taxonomy id from the name. Remember that once entities are migrated you can use the full power of Drupal to find their id’s in later migrations.
Generate entities during migration
Use the entity_generate plugin or a custom plugin to create the entities during the migration process. This gives more control over how the data is transformed, but there’s no way to rollback or update the generated entities through the migration API. This shouldn’t be the default, but can be necessary for more complicated matters such as breaking down a dense wysiwyg field into separate paragraphs (see Benji Fisher’s custom process plugin).
Migrate entities separately with a custom source plugin
See our earlier blog post for a step-by-step guide on this. Drupal core provides lots of useful source plugins, but sometimes you need a custom query to migrate specific source data into entities. This approach gives you that flexibility within Drupal’s migration workflow. Unlike the previous option, you can still rollback and update entities and leverage all the other migration tools.
How you perform a data transformation like this is largely contextual, but these are powerful tools that can be used in many cases. Contact us with any questions regarding complex Drupal migrations, or if you are looking for a Drupal agency to help with your next website project.
Migrating into Layout Builder

This year at DrupalCon North America Redfin Solutions’ CTO Chris Wells had the honor to speak for the first time at a DrupalCon. His presentation Migrating into Layout Builder had the privilege of being one of the most well-attended sessions of the conference.
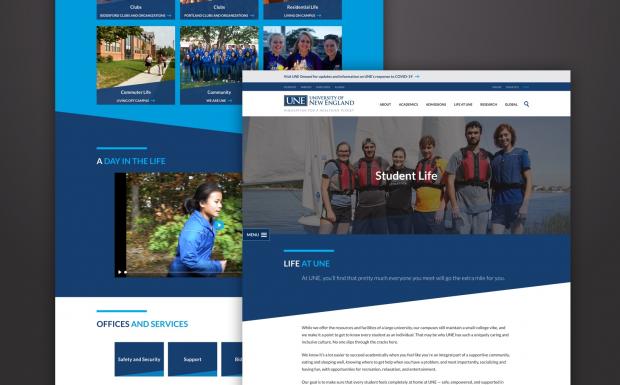
The Client
Redfin Solutions has a longstanding relationship with the University of New England (UNE)--Maine's largest private university--and they were at a turning point where their previously cutting-edge website felt dated, especially the content editor experience. With Drupal 7's end-of-life on the horizon, we worked with them to come up with an upgrade plan to Drupal 8, so that we would have better access to a modern interface.
Previously, their Drupal website had been implementing responsive component-based design principles using WYSIWYG Templates. With more modern tools like Gutenberg and Layout Builder in core, we knew we had great options and opportunities to provide a better content editor experience.
The Transformation
We knew that we would have to find a strategy for migrating the older paradigm to the new paradigm, and for this we chose layout builder. With its core support and logical application of blocks as components, it was a natural choice. But, how would we get larger blocks of HTML into a place where all new pages were using the new paradigm of pages where each page is a Layout Builder override?
Luckily, Drupal has just such a way to transform data on input, which is the Migrate API. The Migrate API follows a common pattern in Computer Science called Extract, Transform, Load. In the parlance of our times (that is, Drupal), we use the phrases "source" (extract), "process" (transform), and "destination" (load). Each of these phases are represented by Plugins to the Migrate API.
Our Situation
In the case of UNE, we were migrating from (source) Drupal 7 nodes (the page body field) into (destination) "basic text" blocks. For the source, we used the live Drupal 7 database on Pantheon. The "basic text" block is the one that comes out of the box in Drupal 8 as a custom block type, and has a title and a body.
We did NOT go down the rabbit hole of regex'ing out each of the components, but rather we migrated the old body into the new paradigm, so that every page uses the same paradigm from the start, and content editors can expand into using layout builder overrides over time. We simply migrated in some legacy styles, which eventually we will discard. We had the staff and resources to clean up any egregious inaccuracy in the translation as needed, so this ended up being the most time-and-cost-efficient solution.
However, the real magic of this migration is really the process part, where we change the data into the format it needed for layout builder.
Layout Builder Storage
So first, we need to understand how Layout Builder actually stores things behind the scenes. Much like an entity reference field, layout builder is really storing a list of sections. When you build a page with Layout Builder, you are adding sections to it (a one-col, followed by a two-col, followed by another one-col, for example). Much like with regular field tables, it stores the entity ID, revision ID, delta (so it knows the right order!), and then some data value. For taxonomy term references, for example, it would store the "tid" for the term being referenced.
With Layout Builder, there's additional complication. Since each section may contain multiple components, there's an extra layer where we need to then store the components for a section each in their proper order.
For this, Drupal's Layout Builder is not nesting another set of entity references. Instead, it's actually storing a serialized Section object. One of the main tenets of a Section object is an array of SectionComponent objects, which each store their own location and position within the section.
The actual table where this information is stored is the [entity]__layout_builder__layout table in the database. Depending on which entity you've enabled Layout Builder overrides for, this may be the node__layout_builder__layout table, or the user__layout_builder__layout table.
Most layout builder SectionComponents are just "blocks" in the traditional Drupal sense of that entity. With that said, there is one new concept that should be introduced, which is whether or not blocks are to be considered "re-usable." Re-usable blocks are the ones you normally create from Structure > Blocks > Custom Block Library, and you then place to be "re-used" across the website, for example on a sidebar on every page.
Non-re-usable blocks are those which are created when you insert block content into a Layout Builder layout. The difference between these two is really just a boolean (and hidden) field on the block, which helps filter blocks using the UI.
And, the very last piece of the storage puzzle to be aware of is the "inline_block_usage" table. This simply stores the block_content_id, the layout_entity_type (ex.g. "node"), and the layout_entity_id (ex.g. "node id"). It's a record of where the non-re-usable blocks are, in fact, used.
OK, so let's do this!
We need to transform Drupal 7 node bodies into blocks, and then migrate the pages into pages, where the "body" of the node is now the Layout Builder overrides.
To do this, we are going to:
-
migrate bodies into non-re-usable blocks
-
migrate the nodes into nodes
-
be sure and link up the previously migrated blocks as Layout Builder Sections/SectionComponents
To help demonstrate these concepts, I've created a fully-functional website repo on Drupal 9 using some CSVs as a source. I'm going to dissect some of the main parts of that for you.
Step 1: Import the Blocks
In many ways, this is a very standard block migration, but the special thing to call your attention to is the "reusable" field in the "process" section:
  # whether or not it's reusable
  reusable:
    plugin: default_value
    default_value: 0
This specifies that the blocks coming in are inline blocks. You may or may not want to use this, but we certainly did, and this is how you set it.
Step 2: Import the Nodes
In many ways, you are just migrating node fields in the way you normally would, mapping fields like title, uid, etc.
Where this one gets special is that we migrate into a field called layout_builder__layout which is the field that stores the overrides. With that, fields expects a Section object (or an array of Sections).
  # This is the layout_builder__layout field, which stores everything!
  layout_builder__layout:
    # Where do we get them from? This `components` field comes from us. We use prepareRow to set it.
    source: components
    # We need a custom plugin to correctly map this.
    plugin: layout_builder_sections_pages
The source for where to get the "body" (blocks / SectionComponents for our Section) is this "components" field. That's not a field in my CSV, it's one where I do a lookup to get all the blocks that were migrated in relative to this node. To do this, I use the prepareRow() method provided by migrate_tools to add a new source property.
# Basics about the source plugin - where to get the data,
# what kind it is, describe the columns in the csv.
source:
  plugin: my_pages
In this new prepareRow method, we can look up the migrated blocks and return them in the correct order; each will become a section component:
Now, the components source field is an array of (non-re-usable) block IDs.
Now, we can use that with our custom plugin which is a Migrate API Process Plugin.
Where the Magic Happens
The process plugin has a main entry point of transform(). This method is responsible for returning a value formatted in the way that the destination plugin expects it. In our case, we need to return a Section (or perhaps an array of Sections if you're feeling adventurous). Remember that SectionsComponents primarily make up Sections, we need to first build up the SectionComponents themselves.
To do this, we need access to the UUID generator service in Drupal, and to create a configuration array for the SectionComponent. The following array details the configuration.
-
id: the plugin and derivative you're using, specifically for us "inline_block" and then the bundle, yielding "inline_block:basic" (the type of block).
-
label: what the label of this block is (the block title). This is a required field, so set it to something.
-
provider: layout_builder - always the same in our case.
-
label_display: whether or not to show the label (boolean)
-
view_mode: which view mode to use when displaying this block
-
block_revision_id: the revision ID of the block to display
-
block_serialized: the serialized version of the block (you can probably leave this null and it will be serialized for you later)
-
context_mapping: to be perfectly honest I don't know what this is and maybe someone out there can explain it to me, but it works when it's an empty array :)
After creating your SectionComponents array, you can return a new Section object by specifying the layout you're using for that section, any settings for the Section, and the array of SectionComponents to put into it.
Try it for Yourself!
If you download the example repo, you can restore the included DDEV database snapshot (if using DDEV) or use the .sql file to import the database. You may need to change the paths in your migrations depending on your setup.
As always feel free to be in touch if you would like to learn more!
Connecting a Transact SQL Database to Drupal

In November 2022, the Drupal community and the Drupal Security Team will end their support for Drupal 7. By that time, all Drupal websites will need to be on Drupal 8 to continue receiving updates and security fixes from the community. The jump from Drupal 7 to 8 is a tricky migration. It often requires complex transformations to move content stuck in old systems into Drupal’s new paradigm. If you are new to Drupal migrations, you can read the official Drupal Migrate API, follow Mauricio Dinarte’s 31 Days of Drupal Migrations starter series, or watch Redfin Solutions’ own Chris Wells give a crash course training session. This blog series covers more advanced topics such as niche migration tools, content restructuring, and various custom code solutions. To catch up, read the previous blog posts Custom Migration Cron Job and Migration Custom Source Plugin.
This blog uses the 8.x version of the sqlsrv module. For Drupal 9+ implementations follow updated documentation from the module.
Most often in Drupal 8, your migration source will be a CSV file, JSON file, or another Drupal database. In some cases your Drupal website needs to coexist in a larger infrastructure. Thankfully, there are various modules for synchronizing Drupal with tools like Salesforce, Bynder, and GatherContent. However, not everything is as clean as those user-friendly modules. This article will dig into migrating data from a Microsoft server using Transact-SQL into a standard Drupal 8 website.
As with any database in Drupal, it starts in the settings.php file. The basic setup for a Transact-SQL database looks like this:
$databases['YOUR_DATABASE_NAME']['default'] = array (
  'database' => '',
  'username' => '',
  'password' => '',
  'prefix' => '',
  'host' => '',
  'port' => '',
  'namespace' => 'Drupal\\Driver\\Database\\sqlsrv',
  'driver' => 'sqlsrv',
);
“YOUR_DATABASE_NAME” is the key Drupal will use to reference this database, but it does not need to match the actual database name. The other credentials such as database, username, password, prefix, host, and port, need to be filled out based on your specific setup and server, but the last two keys are more general and refer to the type of database.
By default, Drupal uses a MySQL database, so the “driver” field is typically set to “mysql.” However, Drupal by itself does not know how to communicate with a Transact-SQL database, so just setting the “driver” to “sqlsrv” will throw an error
To provide that support, first install and enable the SQL Server module (sqlsrv). But the “drivers” folder in the SQL Server module needs to be accessed at the Drupal root folder (usually called “web” or “docroot”). There are two ways to do this:
- Manually copy the “drivers” folder from the SQL Server module (modules/contrib/sqlsrv/drivers) into the Drupal root folder.
- Create a symbolic link (symlink) to the “drivers” folder from the Drupal root folder with a command like this “ln -s modules/contrib/sqlsrv/drivers/ drivers”. The symlink allows the module to update without manual adjustments.
With the proper credentials and connections, Drupal will now be able to read from the Transact-SQL database.
Now the actual migration can be written. There is no core migration source plugin for this, so you will need to write a custom source plugin that extends DrupalSqlBase. Use Drupal’s dynamic query API to get the database's data, ensuring at least one field can be used as a unique identifier for each row. Once the source plugin is written, the rest of the migration will work as usual.